Domestic Bliss Thanks to Varde/Domsjo Sink Hack


Materials: Varde workbench, Domsjo sink, scrap pieces of white melamine, scrap pieces of birch veneer, jigsaw, silicone sealant

Description: When it came time to sort out the kitchen for the new house, it seemed there'd be no cause for argument - we both loved the chunky trad/modern good looks of Ikea's Varde freestanding kitchen.

That said, there was a wee bit of tension brewing over sinks. While I was gushing over the pristine beauty of white porcelain, Phil was lobbying hard for the easy-clean practicality (and fewer wine glass fatalities) of stainless.

Finally though, even Phil had to admit that the Varde stainless steel sink unit was a little - well, ho hum. If only he could fit an elegant Domsjo porcelain sink into one those sturdy Varde workbenches. In the pursuit of domestic bliss, he decided to get hacking.

Step 1: Varde bench before - 3 drawers in a horizontal row. First decide on which side you want your sink. Right worked for us. Pull out two drawers and unscrew sliding mechanisms. Remove the centre panel of white melamine dividing the drawer cavity. Also remove the inner right side drawer mounting panel (see birch piece resting on drawers on the floor.) Cut another piece of birch (sourced from Ikea's bargain basement) to the same size.


Step 2: Reattach these two pieces of birch to the left side of the cabinet - one piece on the second shelf, one piece on the bottom. You'll also need to cut two more birch panels to frame the right side of the drawers. Screw these panels into place from beneath the shelf. (Phil also braced the panels at the top with a piece of aluminium angle.) Reattach sliding mechanisms. Insert drawers.


Step 3: Time for the sink. Cut two pieces of white melamine and attach as shown. These panels will support the sink on either side. They can be screwed in from underneath the drawer support rail, and dowelled into the back panel for extra strength. The two white metal brackets (resting on the middle shelf) come with the sink and can be used as a handy guide for measuring the spacing between the panels. (These brackets will be attached later to help support the sink.)


Step 4: Measure sink side and back, transfer measurements to bench top and cut out the cavity. Note: The back edge will need to be rebated so that the sink can sit far enough back without leaving a gap. So, after cutting out the cavity, lower the sink into place and mark guidelines for the rebate along the back edge. Remove sink and cut the rebate. (Take care to avoid slicing into the thin back panel of the cabinet.)

Step 5: Photo shows the underneath view of sink and the rebate. As you can see, the vertical rebate sections need to be cut fairly deeply into the chipboard backing. A chisel works fine if you're careful. Now attach the white metal sink support strips. Note: In the photo the sink is shown elevated above the supports so that you can see the rebate more clearly.


Step 6: Cut a panel from another piece of birch to fill in the space around the front of the sink. (The piece we found It isn't a perfect match, but should mellow/yellow out with time.) Once the plumbing's all sorted, set the sink permanently into place with clear silicone.

Voila! Domestic bliss. Now whose turn is it to do the dishes?

See more of Wendy and Phil's Domsjo sink hack.

~ Wendy Hincks Ward, Sunshine Coast, Australia

From FJELLSE to FAB!

Materials: FJELLSE

Description: Have you guys seen this amazing hack? Not mine, wish it were.

 before

 after


See more of the upholstered bed.

~ Lauren, Austin, TX

La Bastide de Marie

Remember that fabulous Provence farmhouse where Marion Cotillard was languishing in the July 2010 issue of Vogue magazine?  Well, turns out that it's really a hotel called La Bastide de Marie.  Not only can you languish there but you can also relax at the spa, walk the gardens and enjoy the haute cuisine.  We not be able to look like a French movie star but it's nice to know we can at least feel like one! 


Cookie stand for children


Materials: Duktig (plastic glasses), Kalas (plastic plates), Pyssla

Description: This is a colourful cakestand for children party.

You need: 1 set duktig plastic glasses, 1 set kalas colourfull plastic plates, and strong plastic glue.
First place the 3 selected plates upside down. Glue the Pyssla beads to the plates, all along the border. When it is dried, glue the glasses to the plates, as it is seen on the pictures!


And it is done: you have a colourful party cakestand! (You can do 2 piece, from the sets)

See more of the cookie stand for children.

~ Anita Csorba, Budapest, Hungary

The tale of three desks

Hello all! Hope you had a fabulous weekend!

This is a long, long, LONG, slightly annoying tale (for me anyway), of finding a desk I love into our den. I started the redo of this room a few months ago, but then the kitchen, foyer, family room, dining room and bed making kind of got in the way, so I didn’t work on it for quite a while.  ;)

We’ve always had a Bombay Company corner desk in the room:

Nice sippy. ;)

But with the addition of a laptop, the tall corner desk with the pullout for the keyboard wasn’t working anymore – it was WAY too tall. And, I was tired of staring into a corner when I did work at that desk. (I’m usually on the couch, but whatev.)

So, we took that one downstairs for hubby to use, and switched out his desk for upstairs:

desk

This baby was a $20 Goodwill find, and when I found it, it was a NEON green. (Not kidding. You’ll see in a minute.) I painted it, added new knobs, and we’ve used it in various spots over the years.

Because I was trying to spend very little money on this room’s redo, I had a new vision for the desk and forged on with my changes.

I worked for HOURS taking the paint (my two coats of black, and the previous owner’s crazy neon paint) off the top of the desk:

YIKES. Told ya! I got the top down to bare wood, finally…and then started my next phase. I had a beautiful white desk in mind, with a dark, luscious stain on top. Because the desk was unfinished on the back, I figured I could cover it and wrap the three sides with something and then paint it:

I used plywood first, to even out everything on the back, then installed beadboard panels around the back and the sides. I got baseboard molding to finish off the bottom. Then I primed it…and it sat.

And sat.

For days.

Weeks.

MONTHS now.  :)

I know pretty quickly when something isn’t workin’ for me, and when I’m not digging it, I basically ignore it. Sometimes a new vision will come to me to fix it. Sometimes I realize it’s just an absolute train wreck.

This one was a train wreck:

Nothing was looking how I had in my noggin. I didn’t even paint the front of the desk:

That is a hot. mess. Smokin’ hot.

So…I’ve been searching Craigslist for my next vision – a table instead of a desk. Because of another change in here, I don’t need desk storage anymore. (More on that soon.) So the idea of a table was really growing on me.

It would be open, light, and would show off the molding treatment I have planned for the room. It would have much more surface space, (unlike the current desk), and it would just be pretty darn it! :)

In my head was a curvy table top, beautiful legs and it had to be just the right size – not too small, not too big.

Translation:  next to impossible to find.

Till this weekend.

You know how when you are looking for a job, people always say “It’s all in who you know?” Well, this weekend I found that to be true in decor as well. ;)

A friend, and her friend (who is my friend), and her friend’s friend (HUH? Stay with me peeps!) had a garage sale this weekend. My friend came over for a visit and showed me the great stuff she had bought from the third friend involved with sale.

I was drooooooling.

Then, she was telling me what was left. One item was a medium-sized table.

Ears perk up.

It was all pretty and curvy on top.

Shut up.

It had spindly legs and looked vintage.

Um. Hello? That is the one in my head!

Best part? It was only $15.

Shut. the front. door.

So after some late night texting to friend number two, I got some pictures of said table, then went over to look at it today, fell in love, came home and took some measurements (height, length, width were all PERFECT), and immediately texted her again and said SOLD!!!:

It is LOVELY:

And in really, really bad shape. :) The third friend who sold it had painted it and kept it outside. You can see the brown paint on the picture above. (It’s literally falling right off, and there’s very little left.)

But there’s a few issues. The wood has patinated to a beautiful grey color, but it’s also got some mold growing it as well:

I should stop here and mention that mold fareeeeeks me out. So until it’s addressed, it’s staying in the garage. BUT, there’s only two spots, and my Dad told me some bleach should take them right off.

I did some research online, and found that the fear most (that would be ME) have of mold it largely exaggerated – most molds aren’t a danger to most people. But I’m not messing with this stuff. It looks like black mold, which sounds like is fairly harmless. I found instructions on how to remove it, so I’ll let you know how that goes.

The other issue is the wood itself – obviously being out in the elements has not done it any favors. I’m so afraid that I’ll go to sand it and it will start falling apart.

Part of me wants to clean the mold off, scrape off the paint, then just poly over the whole thing and save that beautiful grey.

The third issue is that the legs don’t match the orientation of the table:

The wide part of the table is the short opening of the legs, the shorter width of the table is where the legs are further apart. Does that make sense? The table has two leaves that fold down, and the previous owners reinforced it underneath with wood, so the leaves don’t go down anymore. But that makes the legs and table not match in their direction.

I need the width on both to match up so I have room to put my desk chair. So I’ll basically have to take the legs off, then turn them and reattach the long way. It shouldn’t be hard to do.

Argh! I said it out loud!! That’s the kiss of death! ;)

After all that, I think I’ll have a perfectly lovely (and safe) desk. Swooon!

So…anyone out there know anything about removing mold from wood? Am I right about the black mold? I read to make a mixture of detergent, water and bleach and clean it with a brush. (Wet it first, wear a mask and eye protection as well.)

Here’s to hoping the third time is a charm!! Wish me luck. I think I may need it.

P.S. Please join me at the August Before and After party tomorrow night!

P.P.S. Anyone want a beadboard desk? Partially complete? (Crickets.) No?

The Avid Gardener

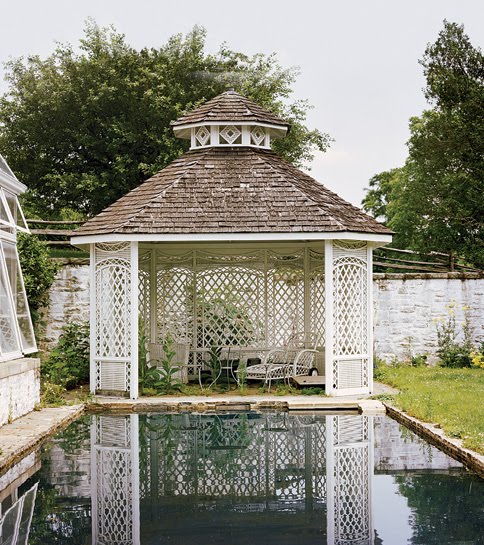
I was hoping that Vanity Fair would post the Jonathan Becker photos of Bunny Mellon's gorgeous garden at her Oak Spring estate in Upperville, Virginia and today I was rewarded.  There is something about a garden that immediately makes me wish I could sit in one reading and relaxing all day.  Bunny Mellon has been an avid gardener her whole life and even helped Jackie Kennedy with the White House Rose Garden.  She will turn 100 on August 9, 2010 and I hope she's letting other do all the gardening so she can sit back enjoy it!


Photos by Jonathan Becker and last by Henri Cartier-Bresson

Check out this stream