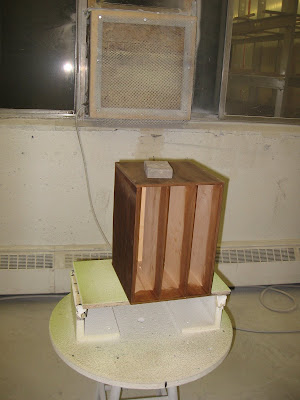
It's also the best use of the Fira drawers I've seen so far. Love love love it! Nice work, Angie.


 Angie says, "I work in fashion, and therefore have a rather large collection of clothing, jewelry, shoes, purses, etc. The problem has always been 'how to store this stuff in a way that protects it, as well as makes it easy to access'.
As a city dweller, I've come to the realization that I'll never have a giant walk in closet, but I thought there must be something small I can do to give myself that luxurious and organized 'walk in closet' feeling.
 Previously all my jewelry was stored in my boyfriend's old fishing tackle box. (Luckily he's not exactly an avid fisherman, so I think the box had only been used once or twice, therefore it's not stinky). While flipping through an issue of Domino magazine I came across an amazing walk in closet with an equally amazing jewelry storage cabinet. I quickly flipped to the sources page, and discovered that the jewelry chest of my dreams was designed by George Nelson (pic, right). Sadly it was $1400. Slightly out of my budget, especially for a jewelry chest.
Even though I couldn't get the Nelson chest, at least now I knew what TYPE of thing I wanted, and so began my quest for the DIY version. After mulling it over for about 6 months, I happened to be picking up some frames at our local Ikea, and lo and behold, what did I find but the perfect substitute in these drawers.
Now all I needed was the base. I thought about trying to track down a vintage side table base, but in the end I found what I needed at Ikea as well, by using the base of the Fornbro side table. (can't find the link on Ikea's website)
1) I first stained the pieces (2 coats of stain) and gave them about 8 coats of varnish with some sanding after the second and sixth coats. I did so many coats of spray varnish in order to get a really smooth even finish.


 2) I then lined the inside of the drawers in vintage wrapping paper and covered the bottom with cream coloured felt. I needed some way to keep all the earrings and necklaces untangled, so the tiny metal tins with glass lids from Lee Valley Tools were perfect. They come in many different sizes and are surprisingly affordable.
 3) I attached the base with simple screws (making sure they are only the depth of the thickness of the wood.
4) Lastly I attached the 3 drawer sections to each other with a zig zag of heavy duty glue in the centers of the sections to be glued together. I used 'No More Nails' but I think a lot of other types of thick glue would work.
I'm so happy with how this project came out, and most importantly I will now be giving ALL my jewelry the love it deserves, simply because now I can actually find it all! The only thing I might have to change is the base. It seems a little less stable than I would like it to be. I may add the round table top (which I did not use) and place it under the entire thing attaching it to the legs, basically using the entire sidetable as it was intended, but upside down. I would then paint the table/base entirely white, since the round table top is black and doesn't really go with the look I'm going for.
It's a pretty easy project, and I'm very happy with how it came out. I think it would look equally good with some other techniques, like painting the wood, or covering it with wallpaper or wrapping paper."


