Hello there! Welcome to the Before and After Party for November! (Can you even believe it’s November?) I can’t wait to see what you’ve been up to! But first, I wanted to show you the pain-in-the-booty project that I am SO GLAD is done.
Remember the pantry door transformation I showed you?:
I was lucky enough to get this beauty for FREE with some help from an Amex Points promotion. But, like always, I saved some cash by installing it myself (with Dad’s help!).
It wasn’t the easiest project ever. Actually, it was really quite annoying. And the part I finished up this weekend didn’t help it’s cause. Sheesh!
I mentioned I wanted to cover the windows on the door with something – I originally bought window film -- but it wasn’t the texture I was looking for. (I ended up using it for the ghost in our foyer!)
So when I posted this project, a few of you mentioned you had used plain old contact paper to get the look I was going for. Bahhhrilliant!
I admit I was a little teeny tiny bit doubtful – I picked up some clear contact paper at Target, and when I got home I tore it open, I was expecting it to be perfectly clear.
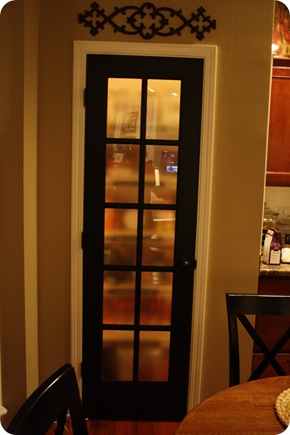
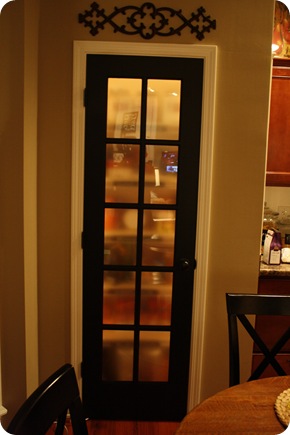
Well…you Squeezies were right (I know, I should just believe) – it was exactly what I wanted! A very soft, hazy look – just enough to let light in, but block the view to the canned goods. :)
What you lovelies didn’t tell me was it was a TOTAL AND COMPLETE pain in the booty to install. Gah. OK, maybe you did. I may have blocked it out.
I started with my supplies – not much needed:
I tried a few things, and the pan scraper worked best for this project by far! I cut out a piece of contact paper, slightly larger than the window pane. When I installed it, I used a razor to trim the contact paper so it would fit perfectly in the pane.
The problem was…1.) the contact paper is supersonic and I tried four razors and not one would cut it easily 2.) when I would push hard to get through the “paper,” the knife would grab at the painted trim around the panel and little itty bitty flecks of black paint were coming off and getting stuck under the plastic:

It was a lot of trial and error. Lots of cutting, holding it up, cutting, holding it up, cutting, realizing I had cut it too small, starting over. :)
When I would finally get the right size, I’d make sure it was perfect one more time:
Then I soaked the window with window cleaner:
You can try to do this without soaking the window but you will realize quickly it’s next to impossible. :)
When it’s wet, you can move it around and make it fit just so:
Then use your scraper (or any flat surface) to push out the bubbles:
You’ll want a paper towel handy to soak up the cleaner as you go. Lots of pushing, wiping, pushing, wiping.
It took FOREVA. Mostly because I would cut it the wrong size, or scratch it when peeling it off the backing. I lost my mind a little more with each window pane. :) I think it took four days of me tackling it whenever I had a few minutes to tackle it. FUN stuff.
Did I mention I couldn’t use the same size cut out of the contact paper for every window pane? You’d think they were all the same size, but amazingly – NO. Most were just a tad different. How is that possible? Because it’s a Sarah project, that’s why. :)
BUT. Dare I say it…SO worth it!!


And I LOVE it.
But I wasn’t done yet. :) Remember how I wanted to light up the inside of the pantry? Dad and I talked and figured out how we’re going to do it – but for now, I rigged it up with an extension cord just to see how it would look:
SWOOOOON. Exactly how I pictured it in my head all those years ago when this project first popped in my head. ;)
I used rope lights around the door frame to get the “glow” look. And now I can see to find my sour cream and onion chips at night:
Awwwww yeah. All is right in my world. :)
**The instructions on the rope lights say to not put them in an area with no ventilation, as they get just slightly warm. I called the hotline on the package to confirm a pantry is OK, and the man on the phone had no record of the product number – the product they make – so he was zero help. But I have talked to two people experienced in wiring/lighting, and they said it’s absolutely fine. When the manual says the lights get slightly warm, they mean slightly warm. :)
The contact paper idea would be perfect for any smallish window where you want privacy but don’t want to block the light – for cheap! The roll was $5 and even with all of my mess ups, I barely used half of it. This would be a great solution for windows above tubs, sidelights by a front door – whatever!
So there’s my before and after for this month…I don’t have a before, before picture handy of the white door we had up initially, but here’s the new door unpainted:
Here it is painted:
And here it is all soft and purdy and lit up:
And here’s all of our food for the world to see before, and the softly lit after:
It makes even wire shelves look pretty. :) This wasn’t an easy project…but totally worth it. And only five bucks for the privacy! (Which, by the way, is WAY cheaper than the window stuff you can buy.)
I am one happy chick!! :)
It’s time to see your before and afters! Remember to only link to the specific post – not your blog. I’ll leave this open so you can link up till next week!
Link it up yo!


