Showing posts with label wardrobe. Show all posts

Walk through my Pax doors!


Materials:
Three single Pax doors, gypse and screws...

Description: Simply installed three single Pax doors in front of my walk-in. Two of the doors are fixed into the floor, and the third one can glide either on the left or on the right... The lights are doing the rest of the job!


~ Olivier Visentin, Montréal, Canada

Wardrobe hiding wires and fuse


Materials: Billy, Besta, Tombo doors, Grundtal rails, brackets and hinges from hardware store

Description:
In our 1903 apartment we were facing the typical problem of an ugly surface-mounted fuse box that we wanted to hide. As the ceiling is quite high, we couldn't find a piece furniture tall enough. So we took a Billy bookcase (79 1/2", 202 cm tall) and fixed it to the wall with metal brackets.


The fuse box is now hidden behind a Tombo door. All the extra wiring for the wifi-hardware is behind the door we built from one of the Billy shelves that we didn't need anymore.


To complete the wardrobe and get space for all our winter gear and helmets we hung a Besta shelf-unit/height extension (47 1/4", 120 cm wide) next the Billy, also with Tombo doors. The Besta had to be turned upside down because of the holes for the feet. The rod is made of two Grundtal rails. The Trones shoe storage makes the all-white wardrobe perfect. Unfortunately IKEA has discontinued the white Trones.


~ Jochen and Edith, Germany

EXPEDIT wardrobe with plants


Materials:
Wxpedit, Dampa, Bigarra, Ikea plants

Description:
1) Assemble 4x4 EXPEDIT with only one vertical row of shelves on the left and without the bottom.
2) Before adding the right vertical panel put in two screws that stand out half an inch to hold the DAMPA curtain rod.
3) Cut the rod to the right size, put it in place, add the right panel.
4) Add three EXPEDIT inserts with doors on the left.
5) Add the plants in BIGARRA pots on top.

Assembling it is faster than assembling the whole Expedit.

This wardrobe is great to create a semi-transparent division between entrance and living room.

~ imaia, Vancouver

Fixing the PAX Sliding Door


Materials: Pax

Description:
I wanted to share my hack because I thought it might give a few people with broken panels in their sliding doors hope. In efforts to save money on my wardrobe, I purchased my PAX used off of Craigslist. I saved $1,500, but had the problem of a door front that wasn't to my taste (the black EIKESDAL) and a glass panel that was shattered (IKEA doesn't sell replacement panels).


To fix the problem, I simply bought enough upholstery fabric to cover the panels, had a thin piece of plywood cut to the same size as the glass panels, and used duct tape to keep the fabric. After painting the "wooden" portions white and assembling the door, I ended up with a great wardrobe at a fraction of the price!


Here's more about how I made the doors and my finished wardrobe all put together.

~ Kasey

Refitting an attic room - storage and room divider


Materials: Pax and Bergsbo

Description:
Objectives : designing and planning our attic room with storage (many for Mrs !) and a little office zone.

Initial situation : 25 sq metres without any divider and without any storage

IKEA Materials :
-2 Pax wardrobes in 100 x 240 cm
-1 pax Add-on corner unit (240 cm)
-3 Pax wardrobes in 50 x 192 cm
-5 Bergsbo doors
-1 mirror door

Other materials
-A door
-milled panels
-insulation plates (wool and hemp)
-many battens

Steps
1. Assembling and fixing against the wall the 2 huge Pax wardrobes and the Pax Add-on corner without forgetting technical shaft (phone, electricity and ethernet)


2. Fixing battens on the back of pax wardrobes vertically and up to the ceiling
3. Fixing the door with battens
4. Mounting the wall with milled panels without forgetting to put insulation plates between battens


5. Finishing the wall with milled panels


6. Reshaping of the 3 192 cm pax wardrobes to fit under the roof and fixing against the wall


7. Reshaping Bergsbo doors and fixing

Here we are ..... many many storage and a really nice and insulated divider !

~ Madotter, Paris region

Teen boy's always closed closet door


Materials: Window panels

Description: Closing bifold doors is just too much trouble for a teen boy. I cut curtain panels in half to make strips. They are stapled to a 1 x 1 which is mounted above the inside of the closet. The strips are narrow enough to walk through easily, but fall right back into place to make the door ALWAYS CLOSED! The black border is chalkboard paint. And yes, those are broken drum heads hung on the wall. What can I say - teenage boy!!

~ Ann Hunter, 1.5 hours from IKEA :(

If MIKAEL was an ANEBODA wardrobe


Materials: ANEBODA

Description: ANEBODA wardrobe with extra shelf, space for belts and ties, metal file dividers on top, and other MIKAEL features.

Basically, I wanted to incorporate the space-saving features of the MIKAEL desk (discontinued and replaced by the inferior MICKE) into my aging, wobbly ANEBODA. This is how I did it (in about 2.5 hours), while making the ANEBODA a much more solid piece of furniture.

Click to read more>>

Walk in closet from kitchen wall panels


Materials: Ikea kitchen wall panels

Description: I didn't want to have bypassing sliding doors for my bedroom closet and thought one door would save space. My house is old but didn't have much in the way of good salvageable architectural details. I bought some Ikea kitchen cover panels (look for them in the damaged area, they are expensive otherwise) They usually have a lot there which are only damaged on one side. Got some construction adhesive, clamps, and a nail gun. The sliding mechanism for the door is just stock iron pipes and casters from any home store.


~ Mike Izzo, South Jersey

Sliding panel curtain door

I love this idea from Rafaela - replacing the curtain panels with fabric of your choice. Would be great as a room divider, wardrobe doors or to shield away a messy work station.

She says "I did a panel for my closet door using Ikea fabric. I love Ikea's fabric and I wanna to do everything with them!"


The Kvartal hangs the Inger fabric beautifully.


See more of her fabric wardrobe panel. She's also completed some minor hacks, like her Ikea entryway bench and fabric art.

A closet to snuggle in

Kathy added a few touches to the Pax wardrobe to create this warm, woody closet. If I didn't know better, I'll think it's a spa and stretch out for a massage.


"I found your web site quite by accident and felt I had located long lost relatives I never knew existed. I have been hacking Ikea items for years but never knew the practice had a name (or a following). Here are photos of just one of my favorite projects. This is my master bedroom closet that I outfitted entirely in Ikea pieces (mostly Pax wardrobes but also drawer units that I’ve forgotten the name of and the ever-popular Expedit. (I worship at the altar of Expedit.)

I started with plain, birch wardrobe doors and embellished them with 4 elements:
- brown and black toile wrapping paper
- expanded metal that I custom-painted with hammered bronze spray paint
- wood trim that I also painted with hammered bronze spray paint
- and finally, door handles made from curtain rods screwed in sideways


I also mounted a Christmas wreath around the main light and wired it to a remote control switch. I use it for ambient lighting.

It is my favorite room in the house, even though it's only a closet. Enjoy!"

A massive built-in project

Adele and Jeremy spent a good 4 weekends to accomplished this massive media, wardrobe and storage combo. Time well spent!

"My husband worked on installing 'built-ins' for about 4 weekends in a row using the new 'black-brown' Pax wardrobes that Ikea has. He customized them to make them look like built-ins by cutting down two of the smaller closets to create symmetrical shelves on either side (so it didn't just look like a big hulking wall of closets).


I can't stand the little peg holes, so he turned around the pieces and drilled new permanent holes for the shelves (so that the line of holes is facing out where no one would see it). Then he cut down two doors so that our TV would be exposed (also to again add some decorative shelving around it so it wasn't just a wall of closets).

We found pulls that looked like our bedside table pulls and we also dyed the little plastic shelf holders black (for some reason they don't make a "black-brown" version of those little shelf holders so they stick out like a sore thumb.)

Now when people get a tour of the house they say 'Oh, were those built-ins here when you moved in?' We think we saved ourselves at LEAST 10K!"

Hopen/Komplement walk-in wardrobe

Laura turns a spare room into a walk-in closet with parts from the Hopen/Komplement range. The results look pretty good too.

She says, "Recently my hubby and I moved into the downstairs part of this house and we decided to create something new in an old little room. So we decided to do awalk in closet!

We found someone selling the Hopen/Komplement system really cheap on Craigslist, and we just went for it. The whole closet could not fit inside our little room, so my husband had to take it all apart and start from scratch. After a whole week end planning, measuring, cutting, and drilling, we end up with this:

Tah dah!!


We are planning on hacking the closet doors into sliding doors for the closet, but that will be another week end and another hack!"

Bedroom series #5: Room dividers for your bedroom

wardrobe room dividerRoom dividers do double duty - carve out your spaces and provide storage. Am loving this room divider hack, which really puts the Pax wardrobe system in a new light.

Pax wardrobe room divider
Phyllis is one lucky woman with a handy hubby who installed this wardrobe/room divider for her.

The beaming wife says, "My husband installed a two parallel row of Pax wardrobes as a closet system/room divider in our bedroom. We had two challenges:
1. How to finish the back side of one row of the closet shells, and
2. How to install closet lighting in a stand alone closet system for a room with carpet. Hard wire would have been really expensive.

He finished the backs of the shells with Ikea laminate flooring and silver corner trim from Home Depot. (We still need to add some artwork on this 'wall'.)

wardrobe room dividerwardrobe room divider(By the way, the window treatment is just heavy fusible non-woven interfacing from a fabric store like Jo-Ann’s. I cut the decorative circles at the top using pot lids and dishes and it attached each piece to the window with double stick tape. It's been up for about 3 years now.)

The Ikea lights were hooked up to an X-10 remote control lighting system that uses wireless to operate the lights. It enables me to turn on the lights from bed in the winter when it’s dark (I really like that feature.) Picture on the right is the wireless switch. The switch is not hard wired – it sticks to the shell with adhesive!

remote controlled closet lighting remote controlled closet lighting

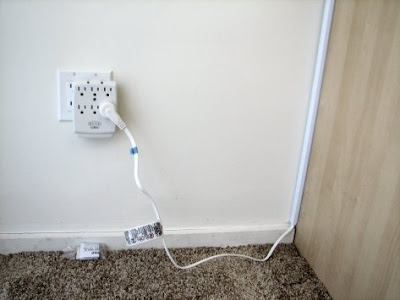
Here’s how the lighting set-up looks. The first picture below is the wall outlet for the closet lighting and in the next picture, you can see a white conduit going up the side to the top of the closet shell.

remote controlled closet lightingremote controlled closet lighting Below is the transmitter unit on top of the shell. There are also transformers for each fixture and a power strip.

closet lightingcloset lightingMy husband is not an electrician by any means – he’s just a handy guy and really had no problems installing this system."

A Bonde divider
Olivier does a divider too, but with the Bonde. He says, "Living in a (small) loft space turned out to be quite a challenge and at one point we needed to make a room divider to separate the dining space from the bedroom.

bonde room dividerThe white unit in the divider is a 4 door white Ikea Bonde unit we already had. The low unit is a 39" Akurum kitchen wall cabinet with a frosted glass door. The cube shelf is just some left over Jarpen shelves cut up and stained to match the rest.

Check out this stream