Kitchen redo: Week ?? (and Indy Style!)

046

Hello there! Are you ready for the holiday weekend? We sure are – we’ve been preparing every night this week by setting off fireworks and annoying the crap out of the neighbors participating in the festivities. Our son is OBSESSED with fireworks this year.  :)

Some of you may remember I was one of the VERY fortunate bloggers to be picked by American Express to use Membership Reward Points for our kitchen redo! The points are gone, but I have most everything I need to finish up the space. I’m still trying to figure out a few of the details, which I’ll talk about in a bit.

I haven’t gotten nearly as much done as I wanted recently, but there is a little bit of progress. I mentioned a few weeks ago that I wanted to make some kind of fridge surround:

backsplash

But when I showed you the beadboard backsplash, one of you brilliant Squeezies mentioned putting it on the side of the fridge – uhhhh – that is SMART.

I thought hard about how I could do it without having to use Liquid Nails on the side of the fridge, and I finally decided on heavy duty Velcro: 

Since I had bought extra beadboard to do the fridge, I went ahead and continued it along the side wall as well:

It’s not built in for reals, but it gives the illuuuuuusion that it is. :) What I love is I don’t even notice the side of the fridge anymore – before the black stuck out big time (especially with the white backsplash!)

I’ve planned all along to put glass fronts on a few of our cabinets, but I after looking through just a few (or 50) kitchen reno mags, I found I also loved the look of open cabinetry – no doors at all!

To see how I liked it in a couple spots, I took the doors off and we’ve lived with it for a while. Besides having an urge to shut the cabinet door that NOT THERE every. single. time. I walk by, I love the look!

I cut some simple strips of wood that I stuck against the edge of the shelves to give it a more built in look:

My plan is to go ahead and paint the inside of this cabinet, and see what I think. Then I’ll decide if I want to keep the door and add the glass, or just leave them open. (I’d have to paint them anyway, with the glass doors.)

I’m struggling with how many doors should have glass if I go that route – most of the cabinets I’d have open are all on one side of the room. The cabs with the not-so-pretty stuff are all on the other, so I don’t want to show of the contents of those. :)

I took the doors off of the cabs above our stove:

I was inspired by these wine racks you can get with IKEA cabinetry:

And I’m going to attempt my own. :) We will see how that turns out!

The inside of that one will get painted inside as well, and if I go ahead with this idea, I’ll have to cut out the center piece that goes between the doors – which is totally freaking me out!!  :)

Anyone with glass fronts or open cabs – how did you decide which ones to open up and how many did you do? This one has me stumped!

I added some trim to the shades that came with the new light fixture:

The trim is super cute and was a STEAL half off at Joann’s, but I’m not sure I love how thick it is on these shades:

Just like everything else I do that I’m not sure about, I’ll live with it for a while. The answer comes to me eventually.  ;)

I love love LOVE the new rug from Pottery Barn for under the table!:

It’s so light and fresh and it still hides EVERYTHING! Whoohoo! It’s an outdoor rug that’s made to look like jute. I love that it’s not quite as thick as real jute, so it’s easier to move the chairs in and out from the table.

The only thing I’m a teensy bit worried about is the little tufts that are coming up:

039

I don’t know if I just snip them down and see how they do or maybe pull them through to the other side? I could just flip the rug but that table is wicked heavy, so we do that as little as possible. :)

I still haven’t hung the new pantry door:

But I do think I’ve decided on the color for that, the base of the table and the island – black for the first two and a little something different on the island:

It has sat like this forEVER and I’m glad I didn’t continue with my idea to paint it cream. (That is just primer on there now.) The beadboard backsplash was going to be cream at first, and I didn’t like it at all. Then I saw the light island with the white backsplash and it was just too matchy matchy to me.

Sooooo…I think the island’s going apple green. :) I’m a little scared and a whole lot excited to try this out – I’m going to go for a pale apple green, not a bright one, so I’m hoping it ties in OK. ACK, I have no idea! But I won’t know if I like it until I try!

Now I just have to find the perfect apple green, and I think I know where to find it:

The Bub’s old nursery had three tones of apple green in it, and I still have some left over. :)

Next step is to get our IKEA butcher block cut down to size for the island – but I want to have a professional do that so it’s a SUPER clean cut. Any fellow Hoosiers in the Indy area know of anyone who has a very large table saw? Let me know!

Soooo…there you go! It’s definitely coming together – slowly but surely. I hope to have it finished up in the next month, but I never set a date cause that’s just the kiss of death. :)

In other news, I was on the Indy Style show again this morning, and I’ll be a monthly guest from now on!:

Are you surprised I talked about beadboard? NO?! :)

Mental note for next time – put twice as much makeup on and find something to do with my hands!! (I need a pointer or something. Seriously.)

NOTE: July’s Before and After Party will be Tuesday night next week – I know the Fourth fun is spread out over the whole weekend so I’m pushing it back a bit.

Have a safe and fun Fourth!

GOD BLESS THE USA!!

Red, White & Blue Decorating

c.everad
While I am on a family vacation I wanted to re-post a popular summer post from the Willow Decor Archives! Enjoy and see you in a few days!
In the summer, who doesn't love decorating with red, white and blue?

Coastal Living
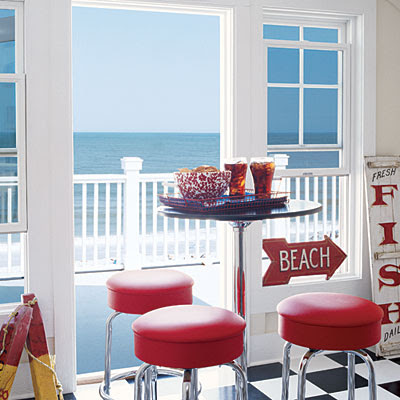
This is a wonderful room and the addition of the 50's diner style stools add a great punch of color. Notice the vintage signs and bouys which contrast the shiny floor, table and stools creating interest.

Coastal Living

What a fabulous painted floor - this room is primarily blue and white but the few red accents really give it life. The red chair, side tables, pillows on couch, and floor accents help direct your eye around the room.

c.everad

Perhaps a bit unpatriotic for 4th of July, but I love how this antique textile becomes art and makes this room.

red door by the beach

Stripes rule this room, with flag, quilt and antique barber pole(?). Painted furniture and antique signs add a rustic warmth and charm. This could be a very busy room, but the white walls add a perfect backdrop and it is charming.

Coastal Living

A fun beach themed room complete with red coral pillows and shell mirror. The striped couch is fun with an interesting trim, but the chair is a bit too loud for me. I also would not have used the striped rug by the stairs.
Home Sweet Home
Okay, so not many people have big red barn, but if you did wouldn't this be fun?!

Country Living

A simple tablescape uses a striped tablecloth or extra material over a white tablecloth for a great accent. Blue splatterware becomes a great vase for sunflowers and checked napkins, white enamel dishes and small flags finish off a great holiday table. Is that Sangria in the pitcher?

Check out other Tablescapes at Between Naps on the Porch

Coastal Living

Here is a lovely porch adorned in red, white and blue. Bright red wicker with striped cushions, blue door, window box and pale blue ceiling are all accented by white trim. A perfect spot to sip lemonade.

Hope these rooms have inspired you! Have a wonderful 4th of July!!!

SEMIhandmade


Materials: 30" Akurum horizontal wall cabinet, reclaimed Douglas fir, MDF panels

Description: I have a custom furniture/cabinetry company in LA, Handmade, that has just launched a line of custom doors, panels and drawer faces for frameless kitchen and bathroom cabinets - anything from the big-box lines, IKEA, you name it. We call the line SEMIhandmade.

In the photos, we took 2 Akurum 30" horizontal wall cabinets, screwed them together, then made doors from reclaimed Douglas fir framing lumber. On the sides are white MDF panels to give the piece a built-in look. We finished everything in low-VOC, water-based lacquer.


See more semihandmade.

~ John McDonald/Handmade, Los Angeles

Cottage Chic

I saw photos of this cute little cottage on photographer Douglas Friedman's website and finally did a little investigating about it. Turns out that it belongs to Cove Landing (995 Lexington Avenue, 212-288-7597) co-owner Angus Wilkie and was featured on one of Martha Stewart's house tours. It was built in the early 19th-century and looks like the perfect kind of place to spend the long 4th of July holiday weekend. I also love that they left the glue covered plaster walls as they appeared after paper was removed from them. It's an interesting contrast to the collection of engravings and Biedermeier furniture. I think most people would have also bought the place and knocked it down to build a McMansion so it's also a testament to the keen eye and fabulous design sense of Angus Wilkie. As Marta would say, "it's a good thing." Enjoy!


Photos by Douglas Friedman

Cat food, litter and nap Cabinet


Materials: Jonas Secretary

Description: I wanted a cat cabinet to hold both the cat food and cat litter. I wanted the cat litter to be high enough so I wouldn't have to bend over to clean it. I also wanted the cabinet to serve as a dark hiding space for my cats (they like to get away from the dogs every now and then). After being inspired by many of the Ikea hacks on this site, I took a trip to Ikea and found the Jonas Secretary.

I put the cabinet together using the Ikea directions and then proceeded to hack the product in the following way:

1. I decided the top "computer station" was the perfect place to put the litter, as I could easily slide it out onto the pull down door. I cut a hole on the bottom right hand side using an electric jigsaw. The original hole was not big enough for my fat cat :) so I ended up cutting almost 1/3 of the shelf away. This allows my cats to drop from the top section of the cabinet into the top drawer.


2. I made an identical cut on the bottom left hand side of the top drawer, creating an opening into the middle drawer.


3. I cut an entry hole (about 5x7 inches) level with the second drawer. I nailed a picture frame I found for $3 at Target to the opening. Now the cats are able to climb into the second food drawer, up to the third napping drawer and then into the litter cabinet at the top.


4. Considering how heavy my cats are, I reinforced the two middle drawers by screwing two pieces of plywood (1/2 x 2 x 16 and 13/16 inches each) under each drawer to help support the bottom.

5. I used clear adhesive shelf liner in the litter cabinet area (along with some sealant) to help with cleanup.

6. Originally, I was just going to place the food dishes in the second shelf, but the space ended up being smaller than I thought. My current food dishes are metal with circular lips. I decided to cut circles out of the bottom of the second drawer to hold each dish.


7. I never liked the handles that came with the cabinet, so I just never put them on. I also thought the cabinet was too dark, so I affixed a mirror I bought at Ikea to the front door. This process was a little more intense than I originally thought, since the door is actually hollow. I cut the mirror to size, then GLUED and screwed the holders into place.

Overall, I'm really pleased with the outcome. Now I just hope my cats like it as well!

~ Teresa, Austin, TX

Check out this stream