Showing posts with label True Value Blog Squad. Show all posts

Office update and the plan

IMG_2593

Well hello! I’m back with another update on my office redo. I’ve mentioned before that I had only one goal in mind when redecorating this space – making it BRIGHT.

And whooowee, it’s working! :) I’m SO thrilled with the direction it’s going.

Last time I updated, I showed you the difference a coat of primer and a couple coats of white did to the space:

image

OH my. Night and day. Get it? Dark room = night. Light room = day. Har.

Anyway, next up was to paint the ceiling and the upper third section of the walls. After visiting the paint section at True Value, I found what I just what I was looking for. It took a while though:

photo (2)

Yowza – HUGE selection.

I used my inspiration fabric and found two colors that matched perfectly! The first was the ceiling:

IMG_2601

I have to tell you – I hadn’t used Dutch Boy paints till I started this redo. But I am in love. I am SO impressed with how well it covers.

The kind I got had a primer in it, but I still thought I’d have to use two coats. I had only used one coat of white primer over the (red) ceiling, (yes, red), and didn’t think there was any way one coat of blue would completely cover the red/primer:

IMG_1975

(YES. The ceiling was red.)

But it covered in in one coat, easy peasy. I painted it at night, (hence the bad night picture) and was sure when daylight came I’d have to do another coat.

NOPE! Love love LOVE!

I chose a beautiful light blue called Purify. Here’s the formula if you’d like to try it out:

IMG_2602

(By the way, remember to always use a flat paint on your ceiling!)

I gotta give more props to “my” True Value – every time I get a paint mixed there, they keep record of it under my name. No more looking through the blog to figure out what the color of my walls are!  ;)

Then it was onto the upper part of the walls. I picked a sand color that matched the brown in the fabric exactly. Again, I started painting at night, and right away I knew it was way too dark:

IMG_2246

It was a true sand color. I mean, like the beach was on my walls, sand. I stopped at one wall that night so I could see it the next morning. But when I saw it in the light, I was still sure it was too dark.

We had the Bub’s birthday party a couple of days later, and I was completely outvoted – everyone loved the darker tone. :) I tried living with it, but it just wasn’t what I was going for.

A friend suggested maybe I should try the color of our family room:

image

It’s called Sisal and I big fat puffy fluffy heart love it. It’s my favorite neutral. So I had it color matched, but lightened 25 percent.

Helloooo! It was perfect!

It’s hard to tell in this picture, but the new, lighter color is on the left, the darker version is on the right:

photo

I know the colors don’t look that different in the picture, but trust me. Or it could be just me – very possible. :)

Here it is against the lovely blue ceiling:

IMG_2597

Sigh. It’s so PRETTY. (Don’t worry, crown molding will cover that red.)

I love the colors with my DIY pendant light:

IMG_2590

Giddy. :) :)

So, here’s the low down on the changes to come in this space…as you’ve seen, I moved my farmhouse desk to this side of the room:

IMG_2580

Before it was squished into the other corner. I love this set up -- I can be on the computer or working and still see what’s going on in the family room and kitchen.

This is the plan for the bottom two thirds of the wall:

yedow-04_077

(source)

Be still. my heart. :)

The window corner will get the following:

windows

I’ve tried moving my rattan chair over there, but then I can’t get to the windows to open the shades and let the light in. :) So my dream plan would be to build a set of window seats in that spot.

Not sure how that’s gonna happen.

Dad? Hello?? ;)

Of course, the windows will get treated with this beautiful fabric:

image

I can’t remember if I got enough of the stripe or the paisley for the windows. It will be a surprise for all of us. :) (By the way, I got the fabric at Joann’s.)

My Pier 1 chair sits where the desk used to sit:

corner

When I bought that chair years and years ago, I wanted the ottoman but didn’t have the money. Guess what I found a year ago at Goodwill? Awww yeah – the matching ottoman! For $10!

Once I get those cushions covered, I think that rattan texture will be perfect in the space.

Finally, the Bub’s old dresser now serves as storage:

dresser

And now that it’s up against the white, I know I want some contrast. Just not sure what color it will be.

I did find a gorgeous, stunning dresser on Craigslist, but it’s much wider. If I get it, the chair would have to move to the window corner. It’s a sacrifice I may just have to make, cause it is GORGEOUS. Ack!

That is, if it’s not sold already. Crossing fingers and toes! For now I’m planning on not having it, just in case.

So that’s the plan for the rest of this redo! I put off the painting for eight months, and now I know why. :) It took one coat of primer on four walls and the ceiling, two coats white, and a coat on the ceiling and upper walls. Yikes. That’s a lot for me, who usually does one coat and done. :)

But if I’ve said it once, I’ve said it a trillion times – paint absolutely transforms a room! The before:

image

And now:

office

Fear not color lovers – there’s plenty coming. I plan on adding punches in the art -- I’m so stinking excited about that part! And I’m thinking about one more accent color…haven’t decided on that yet.

And I am SO looking forward to having such a serene space!

I need it. This is what I look at as I type tonight:

IMG_2603

Ummm. Wow. Just…wow.

(Think we have enough remote controls??)

A Christmas/toy store/trash bin BOMB went off in my family room. Actually, my whole house. Glad I’m done painting the office – I’ve got plenty to do. ;)


*I was one of the bloggers selected by True Value to work on the DIY Squad. I have been compensated for my time commitment to the program as well as my writing about my experience. I have also been compensated for the materials needed for my DIY project. However, my opinions are entirely my own and I have not been paid to publish positive comments.*


Thank you to my sponsor!:

A few of my favorite things…

Hello! Hope you had a wonderful weekend! We are almost done shopping…but still not one gift wrapped. We LOVE the thrill of last minute. I guess. :)

Tis the season for FUN stuff – I don’t know about you, but I’m a total and complete sucker for anything Christmas-themed or related. If it has snowflakes, I’m hooked. Peppermint swirls, forgetaboutit. Glitter? Gah. I give up.

It’s the one time of the year I give into the stuff – because I have NO self control. And yes, I know STUFF has zero to do with the real meaning of the season, so it’s important to keep it in check.

But I love it, and it’s my blog, so I’m going to share some of my very favorites of this season with YOU. Or more specifically, I’m going to GIVE some of my favorites to one of you. :)

It’s my way of saying Merry Christmas, thank you, I don’t know what I’d do without you, paying it forward, smooches…all that.

So let’s get on to the good stuff, shall we?

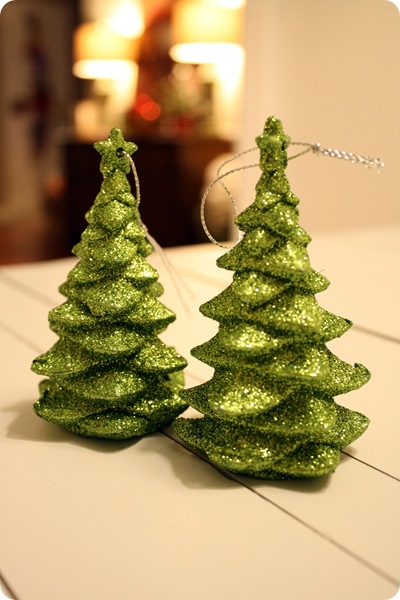
If you saw my dining room post, you know I’m quite enamored with Walmart’s ornaments this year. I can’t stand it, they are so stinking cute. So I picked up a couple of the pretty trees:

walmart glitter

Glittery goodness!

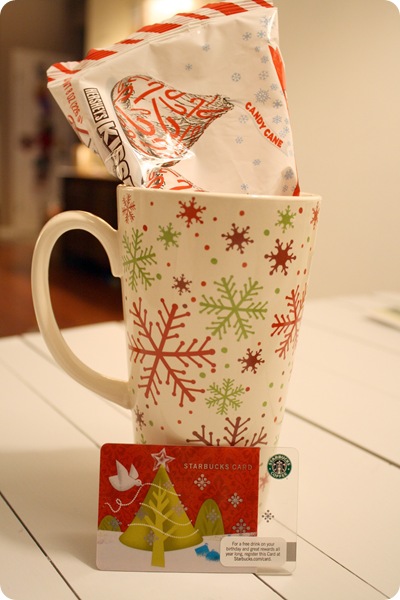
Pretty much every single night this time of year, I enjoy a big, fat mug of hot chocolate. So I got a (cute!) big, fat mug for you to enjoy some hot chocolate as well:

IMG_2401

And while I was at it, I remember that I’m a bit obsessed with the Salted Caramel Hot Chocolate from Starbucks. If you have not had it, please, I beg of you…GO NOW. Or as soon as humanly possible. Starbucks is not paying me to say this, but I wish they were.

OH my. It’s so stinkin’ good. So I got a $5 gift card so you can enjoy one and a half of your own Salted Caramel Hot Chocolates:

And then I remembered another hot chocolate I love, and that’s when I add a candy cane Hershey’s kiss to it and let it melt inside. Uhhh…YUM. I told you about these kisses here and I still love them now. And I’m not even a peppermint kind of girl really – but they are YUM:

IMG_2404

This has turned into a hot chocolate post. Moving on…

The folks at Waverly sent me some of their beeeeautiful new holiday party-ware to try out. They have some really pretty plates, napkins and even cups, and I’m IN LOVE with all of it:

We haven’t hosted any holiday parties this year, so I’m going have hubby pry them out of my hands and so I can give them to you. Yes, I know it may be a bit late for you to use them this season too, but maybe next year? Honestly, I kind of think they could be used any time of the year – aren’t they beautiful?

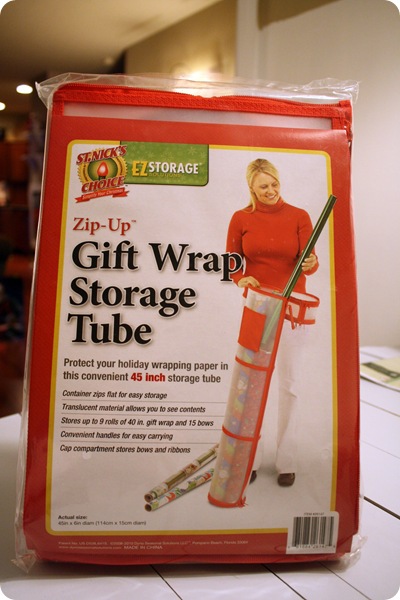
And finally, my very favorite part. I know this one won’t be a big deal to some of you, but I LOVE THIS THING. I found a gift wrap storage thingamabob at True Value a couple of weeks ago:

gift wrap storage

And for all that is good…I finally found something that WORKS. For years I’ve had a few rolls in a long, thin storage bin, but it’s too short to hold most of our wrapping. Then last year I got one of those storage jobbies that stands up, but the wrapping was still too long.

I swear to you, I even considered taking my miter saw to them, to make them fit. I kid you not.

But they don’t have to be sacrificed now! This thing is the BOMB. It’s long enough, and holds a bunch of rolls. And instead of the wrapping rolling off our tower of Christmas bins every. time. I walk by – now they are all contained, and that makes me SO happy!

So I went back and got one for you too, because I can’t be the only one with this problem. Am I? Crickets.

It really is the little things. Candy cane kisses and a tall gift wrap tube, and I’m a happy Chick.  :)

Soooo, I’m giving all of these goodies away to one of you! I wish I could give something to every single one of you, I really, really do. I just hope you know how much I’ve appreciated your sweet comments, emails and support throughout this year.

To enter, leave a comment here. Tell us your favorite part/thing/food of the season. I’ll only have this giveaway open through Monday at midnight, so I can get this all mailed off to the lucky one on Tuesday.

For now, I’m off to write 75 Christmas cards:

I’m just hoping everyone gets them before Christmas. :)

Have a wonderful Monday!!


*I was one of the bloggers selected by True Value to work on the DIY Squad. I have been compensated for my time commitment to the program as well as my writing about my experience. I have also been compensated for the materials needed for my DIY project. However, my opinions are entirely my own and I have not been paid to publish positive comments.*

Thank you to my sponsor!:

The Christmas stairs

So, remember that little bitty project I took on early this year? The one I wanted to tackle late last year, mostly because I couldn’t wait to see it all dressed up for Christmas?

That “little” project was taking the carpet off our stairs – and I may have mentioned it 149 times or so. :)

Our house has been decorated for Christmas for a couple weeks now, but because I had been waiting all year to see our stairs at Christmas, I saved that for the end.

But then I got a little lazy (OK, a LOT lazy), and didn’t want to unravel all of our lighted greenery I usually use. Knowing my luck this year, I’m pretty sure half the lights are going to be out anyway. That’s how I roll. (Apparently.)

So I had something else in mind, and I love how it turned out! I started with sprigs of greenery – I’m in LOVE with the beautiful greenery I’ve found at Big Lots this year and last, but they were completely out of it. Instead, I found this lovely little tree:

big lots tree

Isn’t it fantastic?? :) He’s just a little sad. But I loved his branches, so I just cut the pieces off and twisted a few together:

I had some small red ornaments I wanted to throw in, but I couldn’t find my floral wire anywhere (GAH), so I used some picture wire from True Value that I grabbed for another project:

And it worked great! I just cut little pieces off and strung a few ornaments on:

I nestled them in into the greenery pieces and called that part DONE.

Ever since I saw my friend Melissa’s precious mason jars, I knew I had to do something similar. I LOVE using these jars – I’ve collected quite a few at Goodwill over the years. I just needed ONE more for the stairs, and it took a few trips into the GW (we’re tight, so it’s “GW”), but I finally found it. :)

Melissa used Epsom salts, which looked absolutely lovely. I already had some faux snow, so I just used that. I had to buy one more bag, but they’re a great deal for $1.99 at Target:

faux snow

A little goes a LONG way. Love that stuff – be sure to watch for it after the holidays and grab it up for half off! (You can see how I used this fluffy goodness in our dining room too.)

I just filled my jars, then plopped an LED tea light into the snow.

It’s so sweet and simple:

And you know what? I love it so much, I don’t miss the garland at all! I adore those glowing jars – and of course I only use Ball jars, as a double thump to the chest to my alma mater, Ball State U.  ;)

And yes, I couldn’t resist keeping a couple of our mice from the fall stairs up there. Stink Eye Sis gave me some major stink for keeping them up so long, but I L.O.V.E. them.

I Christmasified the mice a bit:

 christmas mice   

Are you kidding me? Adorable. Aren’t there Christmas mice? Or am I making that up in my head and a wild attempt to explain my Halloween mice on my Christmas stairs?

Whatever. I think they are the cauuutest!!:

Christmas stairs

I was done, but then walked by a pile of sparkly snowflake ornaments I had in a pile to go the basement.

I thought a punch of red would be fun on the picture wall, so I used mounting squares from True Value (those little jobbies are how I attach my mice to the risers too) and attached them to the backs:

I just placed them here and there in the frames on the wall:

They add the perfect sparkly pop!

And yet again, I’m so glad I ripped that carpet off the stairs:

Christmas stairs

I can’t believe the difference from last year – the night shot before the ripping of the carpet:

stairs before

And now:

Wow, the new camera sure doesn’t hurt. :)

And after all that, we’re left with a really cute Charlie Brown Christmas tree:

Or something. :)

I think that’s the last of the Christmas decor around here – but I do have a couple more things I want to show you. You know…inspiration for next year.  ;)

Are you done shopping? I’m half way there…and not ONE gift is wrapped. Wish me luck.


*I was one of the bloggers selected by True Value to work on the DIY Squad. I have been compensated for my time commitment to the program as well as my writing about my experience. I have also been compensated for the materials needed for my DIY project. However, my opinions are entirely my own and I have not been paid to publish positive comments.*

Thank you to my sponsor!:

A white room!

Hello there!! First of all, WOW, you Squeezies have some beeeeautiful Christmas trees!! There are 445 linked up so far – and you have till next Thursday to include yours. That has to be the prettiest post I’ve ever seen. :)

I’ve been working on some BIG changes in our den over the past week, and I couldn’t resist showing you the progress!

I mentioned last week that, in the middle of Christmas decor madness, I decided to finally take on the painting of our den. I know. I am a special kind of crazy. Fruit loop. Cuckoo!

When we built our house, we never had an overhead light installed in the den (bangs head against wall), so it’s always been darker in that room. I decided to go with that cozy feeling, and painted the walls a pretty brick red long ago:

den before

It was cozy, but wow…it was just so dark. I know – it’s brick red Sarah, what do you expect?! So…when I found the inspiration for this room in the form of beautiful new fabrics, I knew I was ready for a change:

UGH…I. love. them. Beautiful!

Because I was going to have to prime the whole room to start the redo, I kept putting it off. And off. And then off some more. And then off for a couple more months. And then again. For about eight months. Or so. :)

But then the crazy hit and I just had to do it NOW. In December. Yes, my husband is a saint.

I started with some supplies, thanks to True Value:

I normally use an old sheet as a drop cloth, but I got to splurge a little bit and got an actual plastic tarp. Awww yeah…that’s the good stuff.

Thanks True Value -- double thump on the chest at ya! Yo.

I chose to prime because I was covering a dark color. Since I’m using white on most of the walls, it was absolutely necessary. I don’t usually prime if I’m painting a new color over another color – even though the experts say I should. :) But when covering a dark color with a light color, it’s necessary. (You will thank me.)

It took me three hours to prime this room – it was NOT the most fun I’ve ever had, let me just tell you. Keep in mind I had to prime the ceiling as well, so that added to the FUN. :)

I only did one coat of Kilz primer, and probably should have done two. But if you don’t know by now – I am incredibly impatient. I’m like a five year old, seriously. I just want to see the final result SO BAD.

I used Dutch Boy paints for the first time on the farmhouse table I found as my new desk. I used it again for the white on the walls -- that awesome pour spout had me at hello:

Oh…I LOVE it. You may notice I use semi gloss for the white over the primer – I know the thought of a gloss on your walls gives many of you the heebs. But I’m adding molding to that part of the wall, and semi gloss over everything makes it look more custom, more authentic. It does in my little opinion – I use it with almost all of my molding projects. (To see what I mean, click here or here.)

I also went ahead and got a new Purdy brush, because I am now obsessed with Purdy brushes:

I was SO excited because I found the coolest painting tool I’ve ever seen while at True Value – a big, huge, honkin’ paint roller:

It rocked my world!! I was so excited about this baby – thoughts of finishing up the room in 45 minutes were swimming through my head.

But…I quickly realized I didn’t have a paint tray large enough to fit the honkin’ roller, and that was a big problem. I headed back to True Value and they had just sold their last one (made specifically for that roller) just hours before.

Curses!! Shakes fists in air!

I got an extra large tray and it just didn’t work – I couldn’t get the paint on evenly enough. So it was back to the regular roller -- but I will use the honkin’ roller one day…oh yes. I will. :)

What did work was this simple little paint brush comb:

IMG_2245Be. still. my. heart. This thing rocks. I think it was $5, and I am quite sure it will save me hundreds in paint brushes. Really.

I used the comb on the brush on the left after priming and painting. The one on the right…well, it’s pretty obvious I didn’t:

Can you believe it? The one on the right has been used more than two times, but still – you can see the difference it’s going to make. I won’t be without it from now on!

So, after one coat of primer on the whole room, and two coats of semi gloss white around the bottom 2/3 of the room, this is where we stand now:

white and bright!

Holy LIGHT Batman!! :) Yahooo…I love it!!

You know what’s weird? At first, after I painted over the brick red, the room seemed smaller than before. You know how everyone says dark walls make a room smaller? Sometimes I disagree – they also make the walls recede and kind of disappear in a way.

The white is without a doubt BRIGHTER. I know – duh. But it had me thinking – could I live with an all white room? Initially, I loved the crisp, clean, bright feeling so much, I thought maybe I could.

But with time, I know I need some warmth and a little bit of contrast – both of those will come with a color above the white, the beautiful fabric I showed you, and some art I can’t WAIT to show you.

I haven’t started any of that yet, but I can see it in my head and it looks ahhhmazing!  ;)

So…what do you think? There some absolutely gorgeous all white rooms out there – stunning! Could you do all white, or do you crave some color like me? This room almost made me a convert…almost. ;)


*I was one of the bloggers selected by True Value to work on the DIY Squad. I have been compensated for my time commitment to the program as well as my writing about my experience. I have also been compensated for the materials needed for my DIY project. However, my opinions are entirely my own and I have not been paid to publish positive comments.*


Thank you to my sponsor!:

Check out this stream