Showing posts with label dining. Show all posts

Lack Bistro Table


Materials: 2x Lack side tables, 1x Lack coffee table, Loctite construction adhesive, Polycrylic

Description: We had a tiny "breakfast nook" in our newly remodeled (Ikea Adel MB!) kitchen and wanted an affordable way to add a small table for two. The space available was *very* narrow (we had to be able to open the pantry and access the window/trash can), and we wanted something pub-height so we could use the same stools that are at our breakfast bar. I had been wanting to hack-a-lack for a while, and when I saw the $19.99 coffee table, I was sold!

Step 1: Purchase 2 Lack side tables, 1 Lack coffee table, construction adhesive, and poly (for the table top, we used water-based). Cost: approximately $40-45.


Step 2: Set one side table top on the floor, shiny (paint) side up. Glue four legs to the corners of the top surface. It can be tricky to get these square and/or level, so be aware you may need to adjust a bit as the adhesive sets. Try to wait until almost completely dry before proceeding.

Step 3: Glue the tops of the four 'first-tier' legs to the bottom (not finished side) of the second side-table top. Weight and wait for it to dry.

Step 4: Repeat step 1 on the top of your new "box" to create the second-tier legs.

Step 5: Measure carefully on the coffee table top to center the table base/legs so overhang is the same on both ends. Glue the tops of the second-tier legs to the bottom of the coffee table top, add weight, and wait for it to dry completely.

Step 6: Apply 2-3 coats of poly to the table top. We only did this on the very top (the coffee-table piece), since that's where beverages, etc would be set, but you could apply it to the entire structure if you were ambitious. Use very very fine sandpaper between coats to remove bubbles.

Step 7: Voila! Bistro table for 2 that fits in a very narrow space. We added felt pads on the corners of the bottom layer to protect the floor.


Leftovers for other hacks: coffee table shelf (same size as top but thinner), set of 4 Lack legs.

~ Blair, Knoxville, TN

Table Head Cabinet


Materials:
From Ikea: Billy bookcase, Billy Height extension, 2 Faktum base cabninets 40cm wide, Faktum wall cabinet (40 x 92cm).
Other stuff: Plasterboard, wooden slats, monitor arm and wallpaper (Cole & Son Wood).

Description:
We needed to add some extra storage space in the our living room and we were looking for a cabinet that would blend in. We came up with the idea to make a cabinet at the head of the table. First we thought to make the cabinet entirely from MDF, but we also wanted the wallpaper that we have in our kitchen to repeat somewhere in the living room. Wallpaper on the side of a thin plate of MDF didn't feel right and for that reason the side of the cabinet had to have a more "wall like" appearance.


Finally we came up with this solution. We stacked up 3 Faktum cabinets (for hidden storage) on one side and a Billy bookcase with height extension (for books) on the other. Both sides with their backs to each other. Both Billy and Faktum have a width of 40cm. In front of the Ikea storage heap we constructed a frame of wooden slats, which in turn was covered with plasterboard. We took 36 mm slats and 12.5 mm plasterboard. This results in a "wall" of approx 5cm. After plastering the bumps we gave this "wall" a wallpaper finish.


Finally we mounted our monitor on the wall with a monitor arm that can fold back completely. This way we have a working space on the table that can easily be pushed aside or made into a interactive picture frame for a diner with friends.

The only thing missing now is a nice colorful fake bird on the wall. A new table project will be next.

~ Roel, Netherlands

New-ish dining room table


Materials: Capita

Description:
Finally got around to "remaking" the dining room table. The top is from the old table...the cart was bought on Craigslist. The Capita braces are from IKEA.


Here is the link to the project.


~ Wan Chi Lau

The Ultimate Twin Highchair


Materials: BJURSTA dining room table

Description: We have a very small home and twin babies. Our small dining room/living room will not comfortably accommodate 2 high chairs and a dining room table. I heard about activity tables for daycare centers. They sell for $300+, which is not in our high chair budget. Other non-high chair options didn't make feeding the babies at the same time sound easy. We wanted something similar to an activity table that would accommodate the babies now and the whole family at mealtime when the twins get older as well as serve as a place to make crafts or paint.

I decided to make a modified activity table for a fraction of the price. I found replacement seats for the activity table online (pkg of 6 chairs for $16.99 and pkg of 2 belts for $2.99 on elitedeals.com) and we had a free Ikea table a friend gave us.


We traced the outline of the seats on the table and cut out holes using a jigsaw. We moved around the supports to make it stable since this is an expandable table (we lost the inner leaf so don't plan to expand it ever). The seats can be easily taken out and turned the opposite direction to make it easy for feeding infants, toddlers to eat dinner, or as an activity table for crafts.


When we want to have adult friends over we remove the seats and place a board over the holes. We figure we can invest in a new table when the babies are bigger and can sit in regular seats. The table/chairs are good for kids up to 24+ months. Please visit our blog to see more pictures and a video demo of feeding 2 infants at once using this ingenious table!

See more of the twin high chair.

~Krystal

Étagère 365+


Materials: 2 rectangular flat wooden bowls (365+ serving plate), piece of broomstick, 2 IKEA screws.

Description: I wanted compact bowls, for fruit on the table and vegetables on the countertop in our small kitchen. The 365+ wooden rectangular bowls were nice compact and easy to modify, since they're made of wood. It only takes a few minutes of work:


1. Determine center of gravity. I balanced the bowl on a bic ballpoint pen, and then pushed the pen tip out to mark the center.
2. Cut broomstick to length. I used 17 cm.
3. Drill holes in bowls (5mm) and broomstick-ends (4 mm) (but depends on the screw size you use)
4. Attach with screws.

I used original IKEA screws from the leftover-metal-bin in the as-is-section at IKEA. For a few euro's you can collect your choice of leftover hinges, screws etc in a paper bag or plastic container. I really like the screws for DIY work.

~ G.V.M., The Netherlands

Woodsy, antique ikea table


Materials: Bjursta table legs, Ivar chairs

Description:
- Remove legs from cracked wobbly old table
- Replace with bjursta legs but use original antique harware and drill new holes
- Whitewash table and throw on some old boards from the attic
- Sand and varathane entire piece
- Paint dark wood Ivar chairs and antique chairs white

~ Athea Boyes, Britannia Beach Canada

Lack shelving unit as dining benches


Materials: Lack shelving unit, Capita legs, Iris chair pads

Description: This may not be a new idea, but I though I would share the end result!

Instructions: We made the benches before we had the table, only because we had them in storage. I love the look, but as a vertical unit they are not that practical. The benches are Ikea Lack shelving units turned on their side. Please note, their needs to be some attention taken to the amount of weight that the shelves can hold. They are not intended to be benches. We have found that they can easily hold 3 150-180 pounds adults.


We used 6 Capita legs (different heights available), 2 at each end and 2 spot in the middle. Choose the height of the leg depending on the height of your table - we used the 10" size. I chose 5 Iris chair pads as they fit the length and depth of the bench almost perfectly. The cubbyholes can now be sued for baskets or other storage containers for toys, games, table linens. etc

A last trick for rented homes and apartments, hang your own lighting or ask your landlord to do it. If it doesn't require a change to the existing electrical hardware, it is easy to put up and then take down when you leave. And really, it makes such a huge impact. We hung a Kroby light fixture and even installed a dimmer switch. The switch we'll probably leave for the next tenants - every overhead light should be on a dimmer in my opinion.

See more of the Lack shelving bench.

~ Alex T

From closet door to dining bar


Materials: Closet door

Description: This is kind of an easy hack, but really gave my new apartment the look I was going for. It doesn't require a lot of work either, just need the right material and you will have it done in 30 min, max.

The hack consists in using an Ikea closet door as a bar for lunch, dinner, or whatever. What is also special about this bar is that it doesn't touch the floor at any point, it's hanging from the ceiling, which apart from giving a very modern look to the place is very useful for cleaning and will save you from kicking the bar legs being barefoot first thing in the morning when drinking your coffee (you can say, this guy is stupid, but you will know it will eventually happen!).


Well getting to it, all you need to do is get your Ikea closet door, attach some metal bars (I used L shaped bars) to prevent it from flexing. Note that if you are using more than one short bar (like I did) that the length of bars that overlap must be in the middle of the space between the cables and the wall, not in the real middle of the door.

Then fix you two L supports to the wall.

Make the corresponding holes on the ceiling and on the door to fix the cables.
Use a chair or something similar to hold the bar while you adjust the length of the cables and fix them.

Remember to also fix the bar to the wall L's with some screws.

Well, that's basically it! You are done!

~ Guillermo, New York

Beach cottage-chic Ivar chairs


Materials: Ivar chairs, wood stain, polyurethane finish, jute twine, large tapestry needle

Description: At a local furniture outlet, we snagged a large, clean-lined dining table in a dark-stained wood, but it didn't come with chairs. After looking at many (rather expensive) chair options, we decided to get six Ivar chairs and customize them to fit our needs.


First, we used a dark wood stain and several coats of polyurethane to refinish all the chairs to match the table. Then, to lighten the overall look and add a bit of beachy flair (we live near the Connecticut shoreline), we wrapped each rung of the chair with jute twine from a craft store, hiding the end of the twine under the wrapping at the beginning and weaving the ends in with a tapestry needle at the end. The result is a very inexpensive set of chairs that perfectly complements the table.
~ Suma CM, Stamford, CT, USA

Billy bar table


Materials: 1x BILLY bookcase, 1x VIKKA AMON table top, 2x VIKKA BYSKE table legs legs

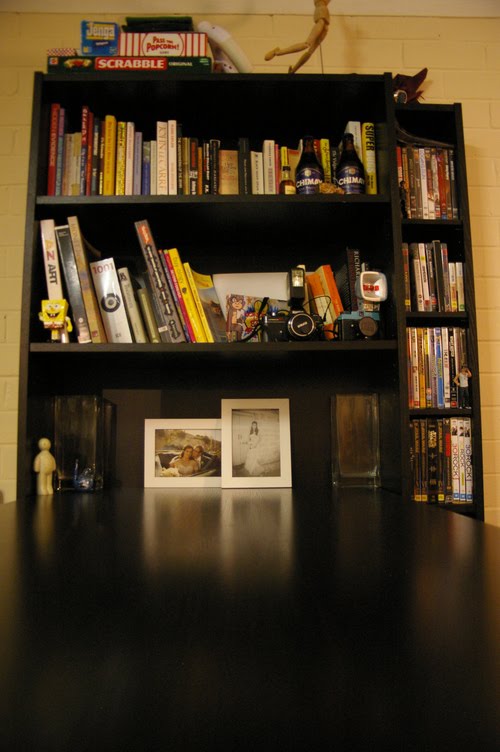
Description: After moving into a small flat, my wife had the brilliant idea of combining our bookcase with a bar-type dining table. We searched high and low on the net for similar ideas but the closest thing we found was the expedit desk (ugly and too small for us).

Much to our relief her inspiration paid off and we are now very happy with our new dining table/bookcase combo.


Here's what we did:
1. fastened the billy to the wall to ensure it's stable.
2. attatch vikka byske legs to vikka amon table top (holes already drilled).
3. place free end of table on the fixed shelf of the billy (approx 105cm high). All we did to fasten the table top was put some velcro tape between it and the shelf - works perfectly but a more secure method could be found (some little L brackets maybe).

Too easy! We finished off by buying 4 tall franklin stools and a benno to put our dvds in.


~ Rocky & Yvette, Perth Australia

Door becomes a table


Materials: Table (Grimle serie)

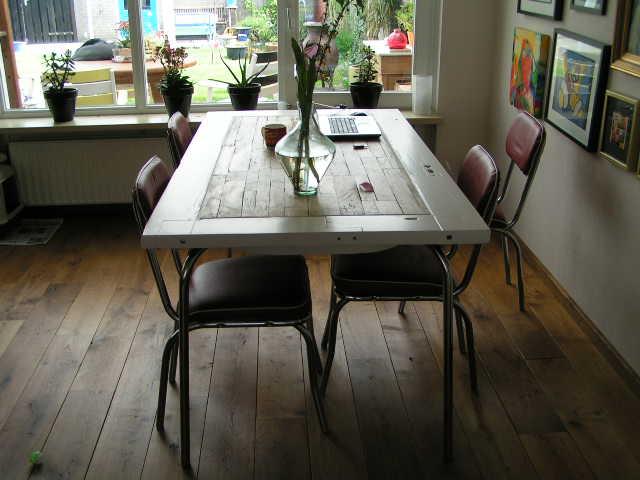
Description: An old rotten door becomes a table.

First I removed the rotten part en snored the door in a rectangle.
Then I filled the center of the door with old wood.
I removed the tabletop from the Ikea table and tightened the table legs at the door.

Take a look at my new table!!!


~ Megje83, Holland

Billy dresser

Glyn and wife send me two hack. This is the first: a dresser for their dining room and it's so thoroughly disguised. I would never have thought this cottage chic dresser was previously an Ikea vanilla Billy.

My wife and I are real Ikea enthusiasts. We wanted some sort of dresser for our dining room and didn't want to pay dresser prices. So we had a go at creating one on a shoe-string budget. First of all we took a plain white Billy shelf and cut it in half. We then had a spare Pax wardrobe top which we got from the Ikea's bargain basement and fixed that in the middle.


For the back we've used some tongue and grove panelling. For the side borders we've used some skirting board which we got from the local DIY center. We also got some wood lengths to use them as "plate holders". The top border was some part of an Ikea bed head (also found in bargain basement). It had the ideal shape for what we had in mind and had to come with us.

All plain wooden items we've painted with some white base coat in order to give it a bit of a used look. Also the curtains are made from Ikea fabric."

***

Voting to end soon!
I forgot to mention that voting for the Ikea Hack of 2009 ends on Jan 15. So, get clicky if you haven't.

And the polls so far ... it's a battle that may just get wild.


The Hamster Haven is leading with 22% of votes, with the Chicken Home coming in a strong second at 21%. Trailing in third place is John's Expedit Room divider (18%). Who will win? You decide. Vote now.

Ivar shelving comes alive as Enzo Mari dining table

This is wonderful. To see Ikea raw pine flesh out Enzo Mari's Autoprogettazione table. Thanks Greg!

He says, "Almost two years ago, I had the idea to make an Autoprogettazione table ["self-project,"] designed by Enzo Mari in the early 1970s, but instead of using 1x2 pine lumber, I'd use unfinished Ikea components.  Well, I finally got around to construction this summer, and finished the table last week.  After surveying every piece of unfinished pine in the store, I ended up using Ivar shelving, which I varnished with a dozen or so coats of hand-rubbed tung oil."


See Greg's post on Enzo Mari's Autoprogettazione table with Ivar and the photosets.


Ingo and Stefan dining set hack

Anny gives the Ingo and Stefan a little sparkle.

"I painted I got an Ingo table and two Stefan chairs for $10 on Craigslist a few months ago. Add a can of Silver Aluminum paint ($1 clearance at Home Depot), sealant ($8 after 10% off mover's coupon), upholstery fabric ($10 for 3 yards at a designer's garage sale) and A LOT of time spent sanding to yield my very first Ikea hack!"


See more of Anny's dining table and chair hack!

Spotted: Snudda hack in art shop

Handem from Turkey has turned into an Ikeahack hunter.

She says, "I spotted this at the local art workshop I go to every now and then. A Japanese lady has painted and decoupaged a Snudda with napkins. This is unfortunately the only example I could take a picture from. There were many more variations. Your imagination is the limit!"


Check out this stream