i'm off to australia in about 5 hours. woohoo!
can't wait for the movie marathon and stale airplane food.
first stop will be sydney for a week and onwards to alice springs. we'll then join a backpacker tour down to adelaide, stopping for the mighty uluru and other sights galore. (i bet 5 ikea allen keys that the tour guide will play this song. it's in the tour guide manual!)
for the next 2 weeks, i'll try to post from wherever i am but i reckon it will be spotty.
have a great weekend and see you in the land down under.
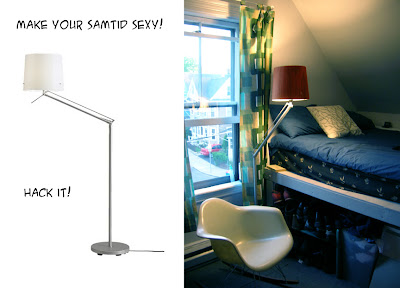
sexy samtid bedside lamp
another hack from adam who a little while back sent in the benjamin laptop stand. this time it's a samtid lamp shade pimp.
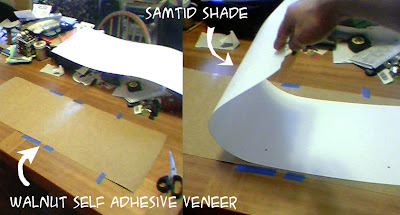
"i love the samtid as it, but it's very bright for a bedside lamp. i found a sheet of self adhesive walnut laminate from a woodworking store that was only $15. i trimmed the veneer down to the approximate size, peeled off the backing, and stuck the samtid shade down.
the plastic shade makes a sturdy base for the laminate - press firmly and make sure it sticks. i used a hole punch to cut the holes out for the frame.
once the shade is assembled as normal i put two coats of shellac onto it, let it dry, and presto! a sexy modern lampshade.
tip: you could also do this hack with some sticky vinyl cutouts similar to lilybee's table hack."
for sale: hemnes daybed
tanya's boyfriend is moving in so the daybed has to go.
"i love it dearly, and loathe the idea of it going to someone who won't appreciate how very cool it is. do you think that you might have some washington dc area readers who might be prepared to make me an offer? i got it in sept with a new twin mattress."
if you're interested, contact tanya at terremotia [at] gmail [dot] com.
go get the now discontinued hemnes daybed and turn it into this banquette of 2006-hack-winner fame.
turn cheap boards into a coffee table
here's an idea from kane for converting cheap ikea panels into a coffee table.
"so you found a nice board from the as-is room with all 4 edges finished (ie. a cabinet door) for a price you can't pass up and want to turn it into a coffee or side table, but don't want to spend a lot of money or have to do a lot of engineering. well, here's an easy solution for a base ... as long as medium brown suits you.
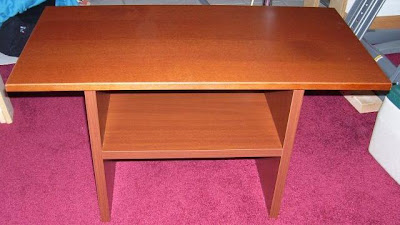
acquire a ramberg bedside table. measuring roughly 18" x 14" x 16", it's big enough around to serve as a table base. more importantly, however, is that this piece is constructed with 7/8" thick sides and shelf, making it very sturdy. with all 4 sides finished and a low $19.99 price tag new, it's affordable too.
just build it up like it's supposed to be - 6 dowels + 6 screws, but omit the glass and pegs. then use 4 small L-clips + short screws on the inside top edge of the ramberg and secure the new top. done.
this is pictured with a wood veneered door (15.5" x 30.5") that was purchased for a measly $0.49."
Labels:
furniture,
living room
sabrina's bedroom vanity
sabrina's bedroom vanity scored from the as-is department. nice touch with the light bulbs. a wee bit of glamour every girl needs.
"i made a make-up table for myself long time ago. i got most of big pieces from as-is area in ikea - a pax drawer, the mirror, vika curry table legs and the wheels, the side hanger, etc and then i punch holes to put light bulbs in it."
Labels:
bedroom
reinforcing billy book case cd insert
here's a useful tweak from michael for the billy book case cd insert to reinforce the shelf and close unsightly gaps.
"the billy book case CD insert is a good idea in principle but has at least 3 drawbacks:
make two "L" shaped inserts from the packing pieces and two brackets. any small brackets will do, i used surplus billy wall anchors. these will be used to space the insert from the back of the book case.
using the "L" shapes as a depth guide, screw the assembled insert to the bottom of a shelf with two more brackets. you may have to bend the brackets out a bit so that the shelf fits snug against the insert.
replace the inserts and slide the shelf / insert combo in in front of them. voila!
"the billy book case CD insert is a good idea in principle but has at least 3 drawbacks:
- the standard fixing method is not very solid,
- it puts the front face of the insert in line with the front of the bookcase, which looks bad,
- and to add to the bad looks it leaves a small but noticable gap between the top of the insert and the shelf above.
make two "L" shaped inserts from the packing pieces and two brackets. any small brackets will do, i used surplus billy wall anchors. these will be used to space the insert from the back of the book case.
using the "L" shapes as a depth guide, screw the assembled insert to the bottom of a shelf with two more brackets. you may have to bend the brackets out a bit so that the shelf fits snug against the insert.
replace the inserts and slide the shelf / insert combo in in front of them. voila!
need a laptop desk? diy your own stand
adam's benjamin laptop desk
adam from boston sends me this cheap but functional laptop desk, hacked from ikea's benjamin stool.
"i've been looking for a laptop desk so that my poor mac won't overheat in the summer time. i was appalled to find that the two most common returns to a search were like... REALLY expensive.
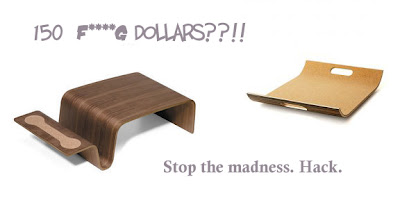
this absurdly simple hack was done using the $19 benjamin stool and a $6 coping saw. you could make it pretty snappy by taping off the edges and spray painting the inside a really bright color. you could also make a shallower tray if you had access to a table-saw with a plywood blade on it."
lazymonster's grundtal laptop stand
this looks precarious but lazymonster has tested it for months and says it has served its purpose well besides displaying the laptop like a piece of art.
it's put together from an old ikea grundtal paper towel holder (can't find the link on ikea website) and some plexiglass sheet. and is made to be used with a tablet and keyboard, so he doesn't really "touch" the laptop. so, no, you can't type away merrily on this.
thanks! nigel, kevin, ian [via lifehacker]
view lazymonster laptop stand photo set
gino's variera macbook stand
another cheap laptop desk option. gino from the netherlands used the ikea variera kitchen shelf (can't find the link on ikea website) which fits his MacBook to a T.
"since the shelf itself is perforated, it helps to cool the bottom of those overheating notebooks. i ended up mounting the shelf upside down on its legs (pix below does not show this as it is a composite picture using the original variera). this prevents the notebook from falling off the shelf should you push against it from the front or the back."
creaneo84's funky monitor stand
breaking slightly from the theme but i couldn't resist slipping in creaneo84's awesome monitor stand that hides ugly cords too. also from a hacked benjamin stool. the front red panel is the deal maker.
thanks, michelle, abby, wendy [via apartment therapy home tech]
adam from boston sends me this cheap but functional laptop desk, hacked from ikea's benjamin stool.
"i've been looking for a laptop desk so that my poor mac won't overheat in the summer time. i was appalled to find that the two most common returns to a search were like... REALLY expensive.
this absurdly simple hack was done using the $19 benjamin stool and a $6 coping saw. you could make it pretty snappy by taping off the edges and spray painting the inside a really bright color. you could also make a shallower tray if you had access to a table-saw with a plywood blade on it."
lazymonster's grundtal laptop stand
this looks precarious but lazymonster has tested it for months and says it has served its purpose well besides displaying the laptop like a piece of art.
it's put together from an old ikea grundtal paper towel holder (can't find the link on ikea website) and some plexiglass sheet. and is made to be used with a tablet and keyboard, so he doesn't really "touch" the laptop. so, no, you can't type away merrily on this.
thanks! nigel, kevin, ian [via lifehacker]
view lazymonster laptop stand photo set
gino's variera macbook stand
another cheap laptop desk option. gino from the netherlands used the ikea variera kitchen shelf (can't find the link on ikea website) which fits his MacBook to a T.
"since the shelf itself is perforated, it helps to cool the bottom of those overheating notebooks. i ended up mounting the shelf upside down on its legs (pix below does not show this as it is a composite picture using the original variera). this prevents the notebook from falling off the shelf should you push against it from the front or the back."
creaneo84's funky monitor stand
breaking slightly from the theme but i couldn't resist slipping in creaneo84's awesome monitor stand that hides ugly cords too. also from a hacked benjamin stool. the front red panel is the deal maker.
thanks, michelle, abby, wendy [via apartment therapy home tech]
Labels:
accessories,
av aids,
work station
slim paperback book case
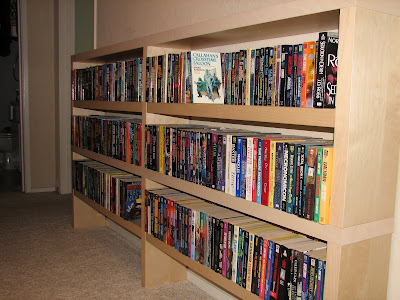
i love books but finding a book case to fit them all is always a challenge. but i'm loving andrew's solution for paperbacks. it maxs out the space, without taking too much of it.
andrew needed a shallow book case for paperbacks in a narrow hallway. instead of using the ubiquitous billy, andrew measured the borghamn height extender for size and it fitted perfectly. (note: link is to the media storage combo. can't find the link to the height extender only)
"i used the posts and plates meant to attach the height extender to the borghamn base to instead stack two of the height extenders. if it wasn't for a window shutter in the way, i'd add another one or two shelves for more paperback storage."
Labels:
storage
grono lamps as bathroom lights
barbara and gary were looking for bathroom light fixture but found nothing till they spotted the grono lamps (can't find link on ikea website).
"we couldn't find any bathroom light fixtures we really liked but walking past the display of little square glass table lamps (grono set) got me thinking. all it took was four of them and four small hand bent brackets and voila! problem solved."
other grono lamp hacks:
> great grono lamp
> arty lamp
monogrammed mini storage chest
zan made a personalized fira mini storage chest as a birthday present for her sister-in-law who likes craft
"i gave the unit a light sand (it comes quite rough), and stained it with a mixture of floor stain, gold paint (you can only see it from close up) and water so it's not too dark. i painted on the embellished letter with gold acrylic paint and the leafy embellishment with oils, the checkered pattern is just a black coloured pencil. then gave the whole thing a coat of sealer and since i didn't have any real varnish on hand, i mixed some water with PVA glue, a tiny bit of stain and tiny bit of gold paint to give the monogram an aged look. and this is what i got:"
related hacks:
> click to view other fira mini storage chest hacks.
Labels:
storage
justin's 2-tier computer desk
justin's 2-tier computer desk comes together nicely as one compact home office.
"i wanted something with a lot of desk space and the ability to grow. i got the mikael desk, the angled capita legs and a lack shelf and mounted them together."
Labels:
work station
vintage style bedside table
love love love this bedside table by courtney of two straight lines. definitely hits the mommy-daughter sweet spot.
"i found this inexpensive unfinished table at ikea that was about the size i wanted. at first i thought i would paint it or slipcover it, and then i remembered these vintage patterns for little girl's dresses that i had found in the front of my mom's sewing book. ...
so, i decided to blow up one of the images and apply it to the side of the table. i painted the whole table a buttermilk color, printed the image on cream paper, decoupaged it on with matte mod podge, sanded it lightly, then waxed the whole piece with a paste wax (like briwax)."
see more of courtney's bedside table.
clothes peg photo frame
more hacks from the shopping sherpa (who isn't shopping this month!). she previously sent in the shopping tote, zippered pouch and rationell placemat and coasters.
this one is nice a twist on a ribba photo frame.
"i bought some ribba frames years ago and broke the glass in one of them. rather than throw the frame away (or put it aside where it would sit forever while i got round to getting new glass cut for it) i did the following:
this one is nice a twist on a ribba photo frame.
"i bought some ribba frames years ago and broke the glass in one of them. rather than throw the frame away (or put it aside where it would sit forever while i got round to getting new glass cut for it) i did the following:
- removed the mat, leaving just the backing card in place.
- bought a packet of home brand wooden clothes pegs, and stained one with the wenge coloured stain i had on hand.
- waited for the peg to dry then glued it onto the backing card.
- clipped on a postcard."
Labels:
accessories,
wall decor
ikea art treehouse
russel tipped me on this piece that ran on european tv channel, arte.
guy ben-ner, assuming the role of robinson crusoe, starts with a 'tree' made out of dismantled ikea furniture. he then proceeds to take it apart and reassemble it into the furniture pieces he started with - a round table, a rocking chair, a chair a parasol and a sleeping loft.
see more of guy ben-ner's treehouse kit.
Labels:
news
geeky dad, funky kids' room
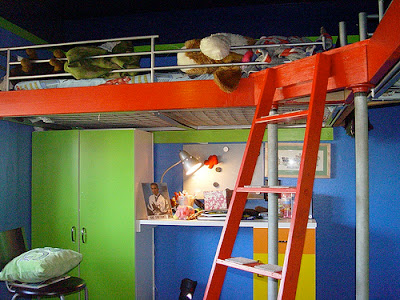
my dad's pretty handy and if ikea was around when i was a kid, i think i would have thrown a major tantrum till i had this kids' room. cue all daddies out there, steal this idea from geekdad and your kid will love you for it.
geekdad jim hacked the tromso loft bed into top-bunks. built a wooden structure to elevate the beds 5 feet off the ground, clearing space underneath for closet, desk and - get this - a fireman pole! the repressed child in me is green with envy.
click to see more of geekdad's kids' room.
also just want to wish all you daddies a happy father's day!
take your kids to smaland and have a kit kat break! :)
[thanks! anna]
a computer desk upgrade
it's all in the finishing and that rings so true for pj doland's jerker computer desk. the high-grade birch makes a big difference.
"i’ve never really liked the beech-finish laminate particleboard shelves (on the ikea jerker computer desk). they’ve always just looked cheap. earlier this spring i replaced all the shelves with high-grade baltic-birch plywood. it only took a few hours of work. i finished it off with a few coats of tung oil, which i buffed to a nice matte finish. here’s the result:"
see more of pj doland's computer desk.
Labels:
work station
colouring cloth
update! see valerie's version of a fabric filled in with colour. do you have a version? send it in and share it too.
the shopping sherpa sent me this all-too-cute zippered pouch made from ikea akseline fabric, which has big leafy motifs in black and white. looking at the fabric now, it just seem all too obvious - as obvious as a kid's colouring book.
with the pouch turning out so well, the sherpa is using the rest of the fabric for a matching handbag. click for links to the fabric and pouch.
originally posted on 17 Jan 07.
valerie's version:
"i bought a yard of the pernilla fabric, stretched and stapled it over wooden stretcher bars in my desired sizes and painted my living room colors into it with cheap acrylic paints. that particular fabric was just begging for some color ... it looks like a coloring book, with black outlines on a white background!"
Labels:
craft,
fabrics,
miscellaneous
smycka garden gate
just in time for summer. pete's new garden gate - built from ikea smycka dried plants. here's how:
build 2x4 frame. place a 1x1 strip around the edge to keep the ends of twigs in place.
cut twigs to appropriate length (my gate was just under 2 foot and i could get 3 lengths out of each twig). use glue gun to attach twigs to frame. place twigs in 2-3 layer to make the gate opaque.
screw 1x2 strips through the twigs and into the 2x4 frame around the edges. hang and enjoy!
Labels:
outdoor
pronomen set of 3 coffee tables
marc, aka roamingstudio, [via the ikeafans forum] sent me his set of coffee table and side tables, bjorna style.
"the image is from our lounge area... and shows three coffee tables i created a few years ago. the surfaces are birch from the ikea pronomen range - 2 x 65cm x 60cm and 1 x 60 x 120cm. the legs and sides are formed from lengths of beech which we found easily in our local diy store.
the dimensions of the legs are 4 x 4cm about 50cm high. the sides lengths are 9cm x 1.5cm thick: 48cm for the width and 108cm for the length. this puts the legs in the same corner positions as the bjorna table. note: you will need to modify these dimensions for the newer range of pronomen (similar to numerar) surfaces.
once assembled, i sanded the surfaces down, and used a wood oil (not ikea) which was yellow in colour. this has the effect to turn the birch/beech into a nice warm honey colour - perfect in late afternoon sunshine.
when i have time i will modify the sides of the large coffee table to take one of the sliding drawer mechanisms - either from the ikea kitchen range; or from the effektiv series. this would allow a small drawer to be inserted into the coffee table."
click to view more of marc's coffee table set. (note: you need to register to access ikeafans)
Labels:
furniture,
living room
hide your battery chargers in snack boxes
max's solution to the many battery chargers we have in our life.
"put all your battery chargers and power adapters in an ikea snack box - hidden and in a nice order.
put the multiple socket outlet in the first box and plug in the chargers. the main power plug can leave the box from the side handle. in the second box, make holes to allow the cables and plug connectors to stick out and write / draw what the plug is for.
just pile the two boxes one over the other. in the top one you can put the items to charge (cameras, cellular phones, even a laptop fits!), the bottom one is hiding and keeping in order all the cables."
ikea website gets a new look
logged onto ikea's us site today and hey, it's brand spanking new! at a glance it looks way better than before. the site seem easier to navigate - with product tabs at the top, replacing the old side bar.
a lot more vibrant with 8 small boxes of news below the main feature. also expanded online shopping pages.
but i've never had a problem with how the old site looked. i only hated its search function to death. so i was keen to find out if they fixed it. whaddaya know? the search function is totally removed from the site.
what is available now is a search for items by name. click on the alphabet and a long, long list of product names appear. scroll through it and click on the item you want. perhaps it does diminish the frustration of having an 'item not found' message but it takes way too much time scanning tiny type. especially since i have to look up product names and links frequently. so this is a downgrade for me. the old search function suddenly seems good. as bad as it was it still gave me results 7 out of 10 tries.
go to ikea's new website and give it a whirl and let me know what you think.
Subscribe to:
Posts (Atom)
Check out this stream
Blog Archive
-
▼
2007
(530)
-
▼
June
(36)
- i'm on a jet plane
- sexy samtid bedside lamp
- for sale: hemnes daybed
- turn cheap boards into a coffee table
- sabrina's bedroom vanity
- reinforcing billy book case cd insert
- need a laptop desk? diy your own stand
- slim paperback book case
- grono lamps as bathroom lights
- monogrammed mini storage chest
- justin's 2-tier computer desk
- vintage style bedside table
- clothes peg photo frame
- ikea art treehouse
- geeky dad, funky kids' room
- a computer desk upgrade
- colouring cloth
- smycka garden gate
- pronomen set of 3 coffee tables
- hide your battery chargers in snack boxes
- ikea website gets a new look
- groovy lack shelving wardrobe
- ikeahacker is 1
- glamorized glass cabinet
- lilybee's bug side table
- one wardrobe, three looks
- malm headboard gets makeover
- ikea summer lovin'
- arty ceiling lamp
- the end of the ikeahacker forums
- build your own cat furniture
- vintage entertainment center
- as-is ikea storage hacks
- billy doors room divider
- megan's breakfast bar
- news: ikea business launched
-
▼
June
(36)