Belgian Decor at Cote de Texas

If you have not visited Joni Webb's fabulous blog, Cote de Texas, this is the week to stop by! Joni is an extremely talented designer in Texas. Her blog was recently selected as one of the top ten decorating blogs of 2008-9 by the Washington Post. This week Joni reviews the Belgian Style that is so hot right now across the country.

Joni describes Belgian decor as "quiet and monotone .. plain linens .. antique elements – ancient stone floors, beams, marble staircases, and acres of limed wood - everywhere. Textures are a very large part of this style – rough, rustic woods and stone surfaces are played against smooth, shiny crystals and glass."

In our increasing complicated world this is a style to come home, relax and unwind in - serene and almost austere.

Please stop by Cote de Texas and see the entire post.

I have saved it as one of my all time favorites, so do not miss it! Here is the link: http://cotedetexas.blogspot.com/2009/01/belgian-design.html

Young Designers and Collectors

Thursday was an interesting day. It started with a Design Big: From Conception to Reality a panel discussion about how to start and manage a successful design business that was sponsored by American Express Open and Domino. (Talk about timing.) Tori Mellott was moderator to the panel with included Stephanie Odegard of Odegard, Inc. and interior designers Christopher Coleman and Ashley Whittaker. It was a very informative discussion and the bullet points that I can give you if you are thinking of starting your own design business is to be extremely organized, learn how to sell yourself and your work, don't turn down your nose at any small job because a simple bedroom job could turn into an entire summer house in a year or two. Also, don't be afraid to get financial advice. We all know that creative types sometimes aren't the most business savvy. And if you're a design assistant looking for work, be open to freelancing which some designers are turning to instead of full time employees.

The day ended with the Young Collector's Night at the Winter Antiques Show where I ran into everyone's favorite Top Design Contestant and Blogger, Eddie Ross with his partner Jaithan Kochar (I can't stop humming the Green Acres theme song whenever I think of them moving to the country!); Emily Eerdmans, the fabulous author of Regency Redux (along with Kelly Wearstler who wrote the forward) who also works for Hyde Park Antiques and was manning their booth; and Natalie Obradovich, a former design assistant to Kelly Wearstler who is currently looking for a design job in NYC.

One of the other topics of the panel discussion earlier in the day was where to find inspiration in this tough economy if you can't afford to travel the world and Stephanie Odegard suggested museums like The Metropolitan Museum of Art where you can visit the art of the world. I also think that The Winter Antiques Show is another great place to be inspired and to also learn something new. I studied art history so I have a little knowledge of decorative arts and antiques but when I look at all the wonderful booths, I realize that there is so much more to learn. Even if your decorating style isn't traditional, you can still be inspired by the paintings or a pattern on a vase. The Winter Antiques Show benefits the East Side Settlement House so your patronage would be greatly appreciated in these tough times. I'm going to stop by again on Saturday to see what I missed the other night so maybe I will see you there! Bon Weekend!

Thanks House Beautiful!

I owe House Beautiful another big thank you for including Habitually Chic as one of the sites they love. And another thank you goes out to Amy Claire Preiser for writing it up! Check out Sites We Love on House Beautiful here. (Oh, let's all make sure we support House Beautiful so they're not next on the list of shelter magazines we loved but are no longer with us!)

Technical Difficulties

I apologize for not posting yesterday or earlier today. My internet service was out for over 24 hours. And as soon as it came back, the television cable went out. Thanks Time Warner. I will now be researching new service providers in addition to working on a new blog post. Please stand by.

For your reading pleasure

I know quite a few people who enjoy a read in the restroom. But problem is, there's not always an easy way to store all those magazines. Terry hacks this magazine holder that not only holds a neat collection of mags but has a place for scented candles too.

He says, "I have made a magazine rack, mainly for the restroom. Since that's where we do most of our reading. From the As-Is department, I purchased a Vika Lerberg Trestle, some hanging trays/holders (I don't know the name of this product), and some rods. Also I bought a new Dokument pen cup and a Tindra candle.

I drilled holes in the side of the Vika Lerberg. Then I took a hacksaw to the rods for the correct length. After a new paint job and attaching the Dokument cups, here's our new magazine rack!

I used both Dokument cups as it can accommodate large candles as well as smaller tea lights. Of course, scented candles in the restroom is a plus.

Putting odd wall space to use

I have a major staircase redo in the works, but until then, I'm adding this post to Beth's party!
Thank you for your encouragement about my last post! You are all so wonderful and it warmed my heart. Thanks to those who have already gotten in touch with me -- I'm so excited about working with you all!!

So you may have heard me complain about our lack of beautiful stairway railings in our house. (Especially at Christmas with the GORG garland wrapped around them.) I only have myself to blame for this -- hubby wanted them when we were building our house but I was already hyperventilating about the growing size of our mortgage with every. single. little. thing. we were adding. The extra four grand for railings (come on) was enough to put me over the edge.

So I've dealt with what we have. Which is a bunch of HUUUUGE walls on our stairway. It is open to the top of our house, about 25 feet up, so there's lots of space to work with. I've done a couple things to fill these spaces, the first of which I wanted to share with you today:

I started with a vinyl rub on from Uppercase Living. If you haven't heard about them, I wrote about the products here. I love this stuff!! Luuuuurve it!

I found floating frames at Joann's at half off -- I've probably spent about $50 on all of them. I love that there is no mat, just the wall showing through:
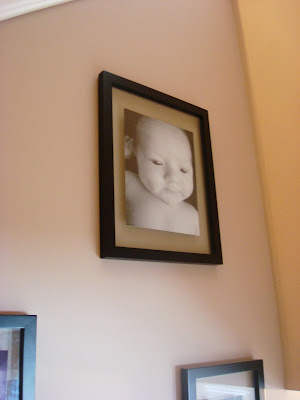
I started taking my own pictures of our son when he was itty bitty -- the baby who NEVER cried screamed like a banshee for his first professional pictures -- so that day I went home, stripped him down, laid him on black fabric, and shot away. I did this often his first year or so:
**This does not work with a two-year-old. :)

I didn't use any kind of design to put these up -- just hung them willy nilly, and I love doing it that way:
It's one of the first things you see when you walk into our home and it's one of my favorite spots. I just added a new one today, and may add one more, but I don't know. I like all the "white space":

I always suggest this kind of wall for weird hallways and stairways. I think it is a beautiful way to deal with awkward spaces like this. The pictures cost me nothing because I print them at home, on regular paper. Love it!

And yes, I hang my head at the awful lack of stepdaughter pictures. I am really a good stepmom, I swear. It's hard getting a good picture of a teenager -- especially when they don't live with you full time. (Or hardly ever come over anymore cause they are too busy with work, choir, friends, boyfriend, school, sporting events....wait, sorry....rant.) Sniff. :)

Bedtime for Titina

Paola hacks a snooze corner for her very fat cat. It looks absolutely cushy in the Duktig doll bed.

She says, "My cat Titina is very fat, it is 9 kg and she used me like a bed. Now it is very hot so I was looking for a nice and comfortable place where it can sleep. Looking at the Italian Ikea store, I have found the Bastis Krona at €59 ($69.99) which I thought was very expensive. Looking for something else to adapt I found the Duktig doll bed at €14,99 ($19.99) and I made Titina happy!

Then I bought two Hedda Rak and sewed them smaller. So I have one cover to use when the other is dirt. I filled it with linen sold with the Duktig bed for upholstery.

"I feel like I'm going to cry!"

This has got to be the worst day in New York. It's snowy and raining. There is at least six inches of muck and slush on every street corner. I think I may have ruined my boots. And it's the day that word came that Domino is to cease publication after the March 2009 issue. I was sitting in the chair at the hair salon trying to enjoy a little pampering when the first death knell email of many arrived. The sentiments were all the same. Everyone is very sad and upset. Domino was a favorite among my friends and although we had heard the rumors it might fold, I hoped they would make it for a few more months or even a year. But alas it is not meant to be.

I just don't get what is wrong with American magazine publishing. Why does it seem like European magazines are doing fine while American magazines continue to fold. I would paid more per issue to keep Domino alive. It spoke to my demographic. I could relate to the designers and people profiled. I could afford the items they featured. As much as I love Elle Decor, which I picked up on my way home, it's very aspirational. That's not the way any of my friends or I live right now. Maybe someday but not today.

The worst part is that many people had just had their homes photographed for the designers to watch series for the April issue. I've already told them that I would be happy to post them on my blog. I already mentioned that I want to feature more original interiors and young designers on my blog this year so this news just makes me more determined to support, encourage and champion them and anyone else who is talented, creative and inspiring.

So if there is anyone out there who dreamed of having their home or designs published in Domino, feel free to email me. Since there aren't many shelter magazines left, I'd be more than happy to start posting them on my blog. But right now, I think I'm going to go take a look through all my old issues of Domino and mourn the loss of my favorite magazine. I might also have a good cry while I'm at it. It's a very sad day.

An Effektiv island to cook, eat, work, play!

Louise came across Ikeahacker when she was looking for some tips on building a banquette. Then, wham! She realises that she has a hack of her own to share - a kitchen-island-room-divider-work-station. Phew! That was a mouthful.

She says, "I moved into a one bedroom apartment with an open concept kitchen-living room. I needed a place to eat and to work that wasn't going to be really ugly if I had people over. I also wanted it to move around. The standard kitchen islands didn't really seem to fit in in the living room. I found these pieces in the office section of Ikea. I started with the Effektiv base with castors and added two Effektiv low add on units. In the bottom one I put in the set of two drawers and fronts. I added an extra shelf to the top one. Then I used some 3M Command Strips to attach a Galant table top that is slightly larger to the unit (they stick well and eliminated the need for drilling). I drilled a 1/2" hole in the back to let my cords out. I have now added a little ring from Lee Valley that makes the hole look more finished.

I bought two stools so that I can sit and eat or work. My pens, pencils and stationery stuff is in the top drawer. I have placemats and other things for entertaining in the larger bottom drawer. I have my printer in the open section, and my laptop gets tucked away on the shelf when I am not using it. Most of the time it is a divider between my kitchen and living room but I can push it up against the wall (computer side facing the wall) for a 'bar' when I have a party. I can also pull it over closer to the counter to have an extra 'island' for prep if I am doing a lot of cooking.

It's about that time

So I’ve been debating on doing two things on this blog for a long time now… my mind started spinning when I started to get really into this bloggy thing a few months ago and I’ve been mulling over it since then.

Because I spend more time blogging then on my real job lately (it’s only a part time job but…seriously) and because I have dedicated so much time to this site (and have loved every second of it), I have decided to go ahead with these two things and I hope you’ll support me…

Nervous giggle. Bites nails.

First of all, I’ve decided to accept advertising. I would love it if any of you (or anyone you know) would want to advertise on the site. My hope is it will become an avenue for Etsy sellers or moms and women who sell items and services. The rate is $10 a month and will go month to month. For more info on this, please contact me via e-mail (see left column).

Another one I’m REAL nervous about is consultations. Back in the day I thought I would never do this, but the idea has occurred to me more than once and it’s been growing on me. I have decided to offer simple decorating consults for $10. They can be just about anything you can think of – help with paint colors, molding ideas, furniture placement, accessorizing, organization ideas, draperies – you name it. I can’t offer any fancy-schmancy graphic programs though, just ideas and inspiration and maybe a kick in the you-know-what to make it happen. And when I say this will be simple, I mean it. You can send pics, videos, etc. Whatever you want. And I will use what knowledge I do have about decorating to help you out. If the project is bigger, like ideas to finish off a whole room, we can discuss pricing.

Click here to try it out and then e-mail me:


I have to say – I LOVE LOVE LOVE when you all e-mail me questions on how do something I’ve posted about and I welcome those, adore those, please keep those coming. I really don’t want to sound like I’m taking advantage of you…and I hope you all keep the e-mails and questions coming. I am thrilled when I get a message from one of you telling me that I have inspired you. That is part of the reason I’ve decided to do this – it has been an honor to be that inspiration and I want to help you make your home even more comfortable and beautiful.

I don’t know why I’m so nervous about this. I guess I don’t want any of you to think I think I’m all that. I most certainly don’t. I have thought long and hard about this and am fully prepared for them to totally flop and that is OK with me! My love of decorating and blogging will keep on…and you’ll all still be my BFs. Foreva.

Thanks for your support!

Clandeboye

I've been a little behind on my magazines and have been trying to catch up before the mammoth March issues arrive and I'm so glad I finally got through February's W magazine. I'm still marveling at the extraordinary life of Lindy, the Marchioness of Dufferin and Ava who lives in Clandeboye, a 2,00 acre estate in Northern Ireland. I guess she could be described as eccentric but in a good way. She grew up in and also married into the Guinness family, spent the winter of her 14th year with her father, step-mother and Truman Capote in Palm Beach, sailed with Jacques Cousteau, and with her husband became "central figures in the contemporary art scene in London" where she became a collector of David Hockney, Francis Bacon and Lucian Freud who also became a brother-in-law by marriage. Today, she continues preserving the family home that she and her late husband restored which is filled with British empire furnishings. The entire story by James Reginato had me enthralled and can be read online at W magazine.

The entry hall above is decorated with souvenirs and treasures from East Asia that were collected by the First Marquess of Dufferin and Ava who was an ambassador.

Lady Dufferin doesn't mind getting dirty in her garden!

Al the bedrooms are named after places that the First Marquess was sent as an ambassador and the beautiful room above is "Paris."

The gallery has beautiful furnishings and amazing floor to ceiling windows.

A lovely portrait hands above the bed in the "France" bedroom.

The bookcases in the library are inscribed with the names of Greek gods in gilt and is home to beautiful leather bound editions.

This whole story reminded me of the type of home that would have been chronicled in watercolors similar to those I saw at the show at the Cooper Hewitt this past weekend and I wasn't wrong but in this case, they were painted by the lady of the house in oil. Lady Dufferin or Lindy Guinness as she is known in the art world painted The Library at Clandeboye, Morning Light above in 2003. An exhibition of her paintings will open in April at the Browse & Darby Gallery in London. I may have to plan a trip across the pond for it because I can already imagine that it will be quite an event!

One of the most interesting rooms is the inner hall which houses heraldry, weaponry and hunting prizes. And the outside of the estate below is just as majestic as the interior and the story of Clandeboye!

Photos by Simon Watson

From Kura to castle bed

Christy wanted to make a castle bedroom come true for her two princesses. Here's what she did.

She says, "When it came time for our two daughters to move into the same room, we bought an Ikea Kura bed for each of them. The oldest desperately wanted a 'sparkly pink castle bed' but (1) the space in their shared room wouldn't allow it, and (2) there was no way I'd spend $1000+ for a castle bed she would outgrow in a couple of years.

Enter the Kura bed. For our oldest, we turned it upside down (so the loft bed is up). Then we cut mdf to wrap the four sides, using a jigsaw to cut out the castle shape at the top and the 'window' in the one side. A few coats of pink paint, some faux bricks using a sponge and white paint, and a coat of sparkly paint later, and voila - a sparkly pink castle bed that is the envy of all of her friends. One bonus is that the castle sides are taller than the bed sides, so now there's really no way she can roll out!


For our younger daughter (too young to sleep in a bunk and too young to request a castle bed--yet), we made a 'princess bed'. This time, we left the Kura bed right side up, painted it white, and then I sewed curtains to hang on all four sides to make a lovely little princess bed. I think sewing the tabs for the curtains took longer than the rest of the beds combined!

Click to view more of Christy's castle and princess beds.

Check out this stream