Showing posts with label outdoor. Show all posts

Stainless bowl hanging planter


Materials: Blanda 14" stainless bowl

Description:
1. Drill-guide jig is cut out (using radial saw) for lip of bowl and held in place with clamps. Underneath is a piece of cardboard marked with the locations of the 4 holes.
2. Tools: drill with self-pilot bit, hammer, center punch, wire cutters, another drill with countersink bit, and swaging tool.


3. Materials: 48" stainless cables with swaged ends (ebay), dual cable ferrules (ebay), stainless eyes and s-hooks (Home Depot), and these marvelous little disks I got out of a surplus box at Minton's hardware closing sale.


4. Center punch and drill drainage holes.


5. Place bowl in jig and drill through jig and bowl.
6. Rotate bowl 180 degrees, align with mark, and drill again through jig.
7. Rotate bowl 90 and 270 degrees, drilling remaining holes through jig.
8. Use countersink bit to remove sharp metal bits.
9. Thread cables through disk, making sure not to cross them.


10. Loop loose ends of cable and insert into ferrules.
11. Swage the aluminum ferrules, this takes 6 passes, 3 for an initial crimp and 3 more to really squish them. Very fun, but watch your fingers!
12. Insert an s-hook.
13. Hang and level.

It worked out perfectly that the cables I found were exactly the right length (48") and had one end with a swage fitting pre-attached. You can use regular stainless wire rope too (3/32") and cut it to length yourself - then you'll have to use the ferrules on both ends.

The discs are not absolutely essential but seem to help to add some cable tension that keeps the bowls at level.

~ Mark Papamarcos, Silicon Valley, CA

Seed-starting shelves


Materials: OMAR shelving unit (I used 36 1/4" high, but you could use the taller one), 2 standard "shop fixtures" (48" long), 4 40-watt T-12 fluorescent light bulbs, 1 timer for the lights, 4 small metal S-hooks (or substitute), 1 two-plugs-to-one converter, 1 extension cord, several large pieces of cardboard (can be from OMAR box), 2 25-foot boxes aluminum foil, clear tape, masking tape, heavy plastic carpet protector (from an office supply store)

Description: I wanted to start seeds in my apartment for transplanting into my garden but I don't have an extra closet to dedicate to seed starting. I purchased the 36 1/4-inch (92 cm) high OMAR shelving unit and set it up against a wall in my bedroom. Why the OMAR? Because the shelves are wire, the height of the light fixtures can easily be adjusted as they are hooked onto the OMAR with S-hooks. Ideally, the grow lights are an inch or two away from the seedlings. I can unhook the chain, place the hook in another link, and rehang the light. I also like the OMAR's nonflammable metal construction, and its ventilation.

Click to read more>>

Barbeque splatter guard and wind protection


Materials: Patrull cooktop guard, hammer, drill, screwdriver

Description: Basically, my new barbeque came with a wind shield that did nothing much more than supporting the warming rack.

When cooking with the hood up, the worktop panels would be greased down with fat, when cooking with the hood down, the oversized ventilation holes at the back would let too much wind through.

I was looking for something I could use for my little project, when I came across a hack here where someone had used a Patrull cooktop guard as a splatter guard around a lathe.

The Patrull turned out to be the perfect solution to my problems (more annoyance really).

The stainless steel fixture is "slide to fit" between 23 1/4" and 37 3/8" and therefore quite versatile when it comes to fitting it to a wide range of barbeques.


All I had to do was to remove the hood, remove the old shield, drill a few holes in the new one to match the existing holes on the cooktop, and put the hood back on again.

In my case, I had to hammer flat the edges at the base and the (now) front to make room for the hood, but this might not be necessary with other barbeque brands (mine is a Campingaz Adelaide 3).

The loss of the warming rack is a small prize to pay for a professionally looking and functioning barbeque.

~ Erik, Norway

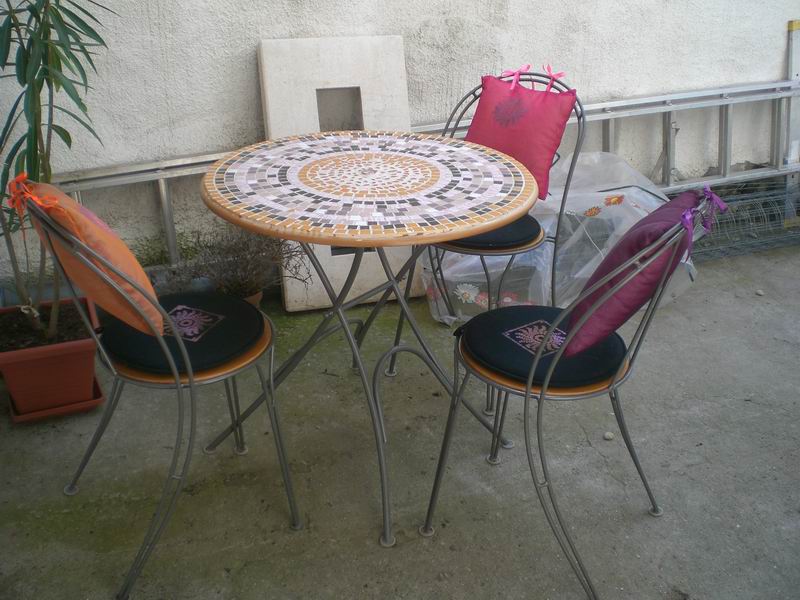
From kitchen to patio


Materials: Ikea bistro set, tiles

Description: I bought an old Ikea bistro set from ebay, put it asunder, gave two coats of varnish to the chairs and the tabletop to make them waterproof. Bought glass tiles and tiled the table. Made matching seat covers (Cilla chair pad) and back pillows (from Irma cushions and leftover Sarita curtains) - and voila! I have a dining set for the patio for less then 200 dollars.


~ Veronika, Budapest, Hungary

bath organizer to succulent garden


Materials: Visen bath caddies

Description: I have a tiny patio which receives very little light, but I still wanted a home for plants. The patio wall managed to get a little light, so I lined the 2 bath caddies with felt, filled 'em with dirt and stuffed them full up succulent cutting to make a cheap-o hanging garden.

~ sara p

CELEBER outdoor torch


Materials: CELEBER oil and vinegar set

Description: I wanted to create a modern looking alternative to boring tiki torches.

1. Fill each bottle with torch fluid.
2. Feed a 1/4" width fiberglass grade wick through the top of each pourer. If you have trouble, use tweezers to pull through. Leave about 1" of the wick exposed at the top
3. Replace lid. Let the wick absorb the fluid (about 5 minutes).

Let there be light!

~ Stephanie Poli, Orange County, California

***
The 2011 Ikea Catalogue is out! 
Anyone got their hands on it yet? Can't wait to get mine. You can sign up to get one delivered to you. Get a sneak peek of it on AT's Unplggd.

~ Jules

Ikea bikini + summer clothing line!


Materials: Frakta shopping bag

Description: It's summer and I made a Frakta bikini!
And then developed a whole line of Ikea inspired swimwear.
It is also a hack of the H&M summer swim line.
So it's a double Swedish hack!
And those are ovenmitts as bikini tops!
Too hot to handle, we hope!


Enjoy + Lots of Sun!

See more at BetterThanLiving.com.

~ Adriana

VASTLIG Topsy-Turvy style planter for $2


Materials: VASTLIG

Description: This works best with younger plants, though I have transplanted full size plants into this upside-down configuration without too much problem.

Tools: Scissors, plant, dirt, boxboard or cereal box-type material-(you can use felt too.) A pole for hanging your plant.


1. Look at your plant and decide if you want to push the roots up through the bottom or if you want to push the plant down through the bottom.

2. Get you VASTLIG bag and cut a X on the bottom. It should be as wide as the branching leaves on your plant or the root ball. You don't want to make this too big or the plant will fall out. But you can make your X smaller in the next step.

3. Cut the boxboard or felt to fit the bottom of the bag- it doesn't have to fit exactly, but it must be a few inches bigger than the X. This is a collar.

4. Cut collar from the edge of the boxboard or felt to the center, and when you get to the center, cut a circle shape. Set this aside.

5. Now put your plant through, then grab your collar and nestle it down into the bag so it holds the roots and keeps them from falling out of the X.


6. Add dirt and water and you are done.


P.S. Ikea for City Gardening!

By looking at Ikea items in a different perspective, I have used them for my city garden.

VASTLIG- bag as upside-down planter

FNISS-waste basket as deep root planter

EVERT- as deep root planter

SMYCKA- tied together as plant supports

TROFAST- as shallow root planter


~ Ninjarita, Minneapolis

Candle dish birdbath


Materials: Ikea Bigarra Candle Dish, 3, 4' wood dowels

Description: I bought the Bigarra Candle Dish to use as a - GASP - candle dish.

A few days later I began thinking about making a birdbath from scratch because most of them are either too expensive or too ugly. Oftentimes, they are both.

Realized the candle dish was the perfect shape and size for the sleek/organic look that I wanted. Ta Da!


Just hammer the dowels at least 12" into the ground. Use a level to make sure they're even and place the dish on top.


Full instructions on staining dowels etc.

~ Karen Bertelsen, Ontario, Canada

International Shed of the Year is an Ikea Hack

Chuck does Ikea hackers proud by winning the International Shed of the Year competition run by Shedblog. His shed, well it is hardly a shed, a cozy little hideout I would say, features a 16' long window made from Ikea glass shelving. I can't say that the window nailed the prize for him, but it's pretty impressive.


See more photos on Shedblog. Or hop on a house - er, shed tour of Chuck's winner on Apartment Therapy.

A chair to rock your Summer

Alex's Emmabo Rocking Chair finally gave up its ghost. But he resurrects them into this outdoorsy deck chairs. How perfect for summer.

He says, "I've retrofitted wooden slats to an Emmabo Rocking Chair frame. It's now suitable for outdoor use as a deck chair.

The metal frame is salvaged and fitted with wooden slats from Home Depot. The wood is pressure treated to withstand outdoor use and then painted with one coat of black-brown ebony stain. When dried, the slats are then fitted on to the frame using 3/4" cable clamps, which are for electrical use but fit the rod of the Emmabo frame perfectly.

See more of Alex's Emmabo deck chair.

DIY hacked cold frame for the garden

Lorene presents us with her "urban hillybilly chic" hack - a cold frame to protect your vegetable patch from chilly weather. Anyways, if you're one with a green thumb, better start scoring some cheap Gorm shelving from the as-is. You'll probably be wishing you did in ... er ... Jan?

She says, "Cold frames are devices to protect your tender vegetables from wet, chilly weather. They are a god send in cool climates when you’re itching to plant and Mother Nature thinks winter is not quite over yet."


See her instructions for the DIY cold frame for the garden.

ikea celebrates summer

it's summer over at ikea and it's looking bright and breezy. click here to check out their summer collection.

since we're all in sunshine mode, thought i'll post some outdoor or garden hacks.

container garden table
pia hacked an old lack table into storage for gardening equipment and place for her plants.

she says, "it now hides our tumble drier and lots of gardening equipment. i removed the old legs, put on vika kaj and turned them so they became maximum height, which is 90 cm (approx 35"), then i used some fabric and some ironing glue, you can buy that at ikea as well. no sewing required, simply measure the places you want to hang the curtains, and iron the edges - you need to make an opening for the curtainholder to go through, and then attach the curtains to the table as shown in the photo."

bouquets of bloom
chelsea pairs an old farm window with ikea for a bit of country.

she says, "so, i have a bunch of old farm house windows (from a friend's family farm), and had yet to put them to use, but had lots of ideas fluttering through my head. today i finally used one of the windows. it was super simple. i used a kroken kitchen rail, and 3 kroken cutlery caddies.

i attached some eye hooks to the back of the window, and then chain to that (which i bought by the foot at my local home improvement store), and then attached the chain using S hooks into the soffit overhang. i still plan to stencil a little hummingbird, and some sort of quote (once i decide which one). it was really easy, only took me about 20 minutes, and cost only $16!"

spruce up the old
alessandro gave the wooden applaro chaise lounge a sunny new colour.

let there be light
dario from italy, with help from his neighbour, sandro, hacked some outdoor lighting for his graphic studio.

he says, "i live in italy close to venice and have a graphic studio in the countryside. together with our neighbor sandro we had to decide outdoor lighting styles of the studio. he came up a cool and cheap idea.

here is what you need:
- light bulb
- light socket
- ordning cutlery stand
- ikea plastic mug (actually they don't sell what we used anymore, but i believe kalas can be even better.. no handle!)
- bolt and screw
- transparent rubber pipe

just make an hole on the bottom of the mug, cut the handle and put it together.. that's it! the mug keeps the rain away from the wires and will give a touch of relaxing color to your house!

see more on dario's blog.

now for some summer fun
need some thing to hold toys around the pool? this one from rob is simple but totally workable.

rob says, "i cannot take credit for this hack. i got the idea from familyfun.com. they say to use a small white clear wastebasket, and i thought of the fniss clear wastepaper basket. it only took a couple of hours. the nice thing about the fniss is you don't need to use the marbles per the directions. it makes a nice umbrella stand, then in the summer use it around the pool for toys."

see more on rob's blog.

***
help change the world with an email
on another note, this is some thing we can all do to help make this world a better place. if you remember, colin beavan (who is also part of the liferemix network) of no impact man is meeting congressman jerrold nadler this friday to ask him to support an effective global warming mitigation policy that is based not on what is politically possible but on what is scientifically necessary.

his dream is to show nadler and speaker pelosi thousands of emails supporting his position. if you'd like to help, go to Colin's blog, copy the form email, and send it to noimpactman+nadler+pelosi@gmail.com. those of you who aren't American citizens, please put "From a world citizen to whom American policy makes a huge difference" in the subject, so that he can deliver them but keep them separate.

Check out this stream