 If you need anything to do this weekend while it's raining, you can check out the New York Junior League House Tour on Saturday, May 2nd. Where else would you get the chance to snoop inside the homes of New York's chicest residents including interior designer Sara Story (above), antique dealer Todd Merrill, artist Hunt Slonem, and architect and designer Campion Platt among others. The tour is self guided so you can take your time and enjoy this glimpse into how the other half lives. Just make sure you wipe your feet at the door! Oh, and no peeking into the medicine cabinets!
Junior League House Tour
If you need anything to do this weekend while it's raining, you can check out the New York Junior League House Tour on Saturday, May 2nd. Where else would you get the chance to snoop inside the homes of New York's chicest residents including interior designer Sara Story (above), antique dealer Todd Merrill, artist Hunt Slonem, and architect and designer Campion Platt among others. The tour is self guided so you can take your time and enjoy this glimpse into how the other half lives. Just make sure you wipe your feet at the door! Oh, and no peeking into the medicine cabinets!Announcing Harry Heissmann, Inc.
 You know times are tough when even the top design firms are having problems. But everything happens for a reason and in the case of interior designer Harry Heissmann, it has led to the creation of Harry Heissmann, Inc. Harry is a beloved designer in New York who has spent the last nine years working for Albert Hadley, Inc. but soon he will be going to work in his own office! One that he has already started to mentally redecorate.
  His website isn't finished yet but you can get a sense of his personal style in the apartment he shares with his partner, Mark King, that was featured a year ago in New York magazine. Oh, and since Mark works for Mrs. John L. Strong, Harry's going to have the chicest business cards in the design world! The style of his home is just as fun and fresh as his mentor. One of Harry's favorite possessions is his Jeremiah Goodman drawing of his living room at night (below).
 I am excited for Harry to embark on this new phase of his life because I know he is going to enjoy it, even if it does seem a little scary. As I told a friend, sometimes the baby bird has to be pushed out of the nest before they think they are ready to fly on their own. But I have no doubt that Harry is going to be flying high very soon!
 Blue and White
 The design world converged on John Rosselli Antiques last night to celebrate BeeLine Home by Bunny Williams. (In case there is someone who doesn't know, John and Bunny are married.) You know it's going to be a good party when Presidential interior designer Michael Smith walks in! I heard he was touring the Kips Bay Decorator Show House earlier in the day too! Also on hand were textile designers John Robshaw and Carolina Irving. I even got to see what interior designer James Andrew was wearing in person and soon you'll be able to see it online.
 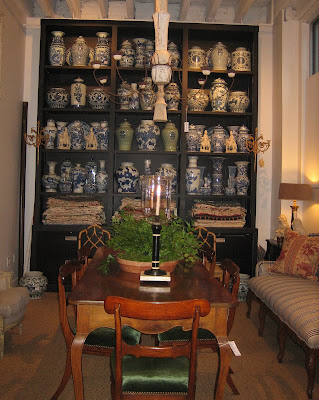 The best part of the evening was chatting with John Rosselli himself. My friend Megan commented on his wife's wonderful new line of furniture and he said that they have been in business for over 50 years so you have to reinvent yourself. He also mentioned that the limited edition collection looks fresh and new compared to some of what is on the market. I told him how much I loved all the blue and white porcelain in the shop and he said, "I was working with Babe Paley once" when he stopped and asked us, "do you know who Babe Paley is?" We nodded and replied that we did. He continued, "well, I was working with Babe Paley and I was showing her some porcelain and she says, 'you know John, you can never be too rich or too thin or have too much blue and white porcelain!'" I don't know which I loved more, the story itself or the twinkle in his eye as he told it! Great moments don't get much better than that!
Charging Station
Here's another charging station, albeit a more extensive one from Jason.
He says, "I have recently been researching a charging station for myself that
(a) was relatively inexpensive,
(b) didn't look like something my father would own, and
(c) would last longer than a modified shoe box.
So, after a month of lurking and searching I decided to construct a floating landing strip / charging station for the entry way of my apartment. Taking a hint from the 'desktop cable box' posting I constructed this piece by hacking the Ikea Bjorken bathroom wall cabinet which I got at my local Ikea in Burbank, CA for $40.
I constructed it per the instructions with the door right-aligned, except I took one of the mounting reinforcements and moved down to the bottom right inside corner to prepare the cabinet for horizontal mounting. Also, I did not install the tempered glass shelves into the unit. Before mounting it onto the wall I drilled a 2 inch hole on the left (soon to be bottom) side of the cabinet to feed the surge protector into.

I mounted it using a leveler, zip tied the slack on the chargers and voila. The cut out corners of the door can be used to feed the charger cables to the top of the unit.
Simple, clean(ish), and out of the way.


New developments:
1. I'm going to install a switch between the wall socket and the plug of the surge protector so I can turn it on and off as I like and be more green,
2. I'm going to drill another 2 inch hole on top (right side) of the cabinet to more cleanly feed the charger cables to the top surface, and
3. I want to nail the surge protector cable against the wall using those little plastic loop/nail combo thingies.
See more of Jason's charging station here.
God made iPhones for bloggers
I think I have died and gone to heaven.
Remember my taped together phone from my last post? So many of you were so sweet andharassed me, made fun of me made me feel so much better about my crappy phone.
You must know that I've been through about four phones in two years. I had a cute little pink one when our son was born. And it was soooo adorable when he would want to play with it and then eat it. It died. So did the others -- throwing, dropping, baby goo, whatever you can think of...they all died.
So the last time I said, I'm not buying another nice phone again until he's out of this stage. I've learned he'll never be "out of this stage" so I decided I wanted something NICE. Hence this glorious purchase:
 Hubby has had one for years and I've never understood how he can lay in bed for an hour before sleeping, just messing around on this thing. Ummmmm YEAH.
Now I get it.
I am telling you people, it is freakin' amazing. AMAZING. I can get on the Internet from ANYWHERE. I can play just about any game I want. Look -- I got a free "app" that's a level:
 I would have never known that our kitchen island isn't level if I didn't have this phone. What would I have done??? (And yes, just another example of how weird I am -- I'm a tool kind of girl and this about put me into a tizzy when I saw it.)
I'm still not sure what "apps" are -- just fun stuff you download I think. Like the faux lighters you see lit up at concerts. Freakin' adorable.
Look what I can do whenever I want:
 Check your e-mails!! Look -- there are NONE in the inbox. I push.a.button and there they are. I've checked them ALL!! Oh good God, I'm not kidding, this is the
 best second best like, fifteenth best day of my LIFE.
So if I'm sitting in the doctor's office, I'll never be bored again.
Cause I have the iPhone. (Why didn't I have this when I was pregnant??)
I won't be bored at a stop light, because I'm so impatient I can't wait for 15 seconds.
Cause I have the iPhone.
I won't get bored drying my hair.
Cause I have the iPhone.
(You think I'm kidding.)
It even has a pretty decent camera on it: Giddy.
Now just like Crackbook, I'm sure this will wear off eventually. (Right?)
It does make me worry that we are creating a generation of kids who won't be able to just sit and not do anything. That part of this stuff freaks me out a bit. I have a love/hate relationship with technology.
But for now...I LOVE.
Remember my taped together phone from my last post? So many of you were so sweet and
You must know that I've been through about four phones in two years. I had a cute little pink one when our son was born. And it was soooo adorable when he would want to play with it and then eat it. It died. So did the others -- throwing, dropping, baby goo, whatever you can think of...they all died.
So the last time I said, I'm not buying another nice phone again until he's out of this stage. I've learned he'll never be "out of this stage" so I decided I wanted something NICE. Hence this glorious purchase:
 Hubby has had one for years and I've never understood how he can lay in bed for an hour before sleeping, just messing around on this thing. Ummmmm YEAH.
Now I get it.
I am telling you people, it is freakin' amazing. AMAZING. I can get on the Internet from ANYWHERE. I can play just about any game I want. Look -- I got a free "app" that's a level:
 I would have never known that our kitchen island isn't level if I didn't have this phone. What would I have done??? (And yes, just another example of how weird I am -- I'm a tool kind of girl and this about put me into a tizzy when I saw it.)
I'm still not sure what "apps" are -- just fun stuff you download I think. Like the faux lighters you see lit up at concerts. Freakin' adorable.
Look what I can do whenever I want:
 Check your e-mails!! Look -- there are NONE in the inbox. I push.a.button and there they are. I've checked them ALL!! Oh good God, I'm not kidding, this is the
 So if I'm sitting in the doctor's office, I'll never be bored again.
Cause I have the iPhone. (Why didn't I have this when I was pregnant??)
I won't be bored at a stop light, because I'm so impatient I can't wait for 15 seconds.
Cause I have the iPhone.
I won't get bored drying my hair.
Cause I have the iPhone.
(You think I'm kidding.)
It even has a pretty decent camera on it:
 Giddy.
Now just like Crackbook, I'm sure this will wear off eventually. (Right?)
It does make me worry that we are creating a generation of kids who won't be able to just sit and not do anything. That part of this stuff freaks me out a bit. I have a love/hate relationship with technology.
But for now...I LOVE.
2009 Kips Bay Show House Designer: Bunny Williams
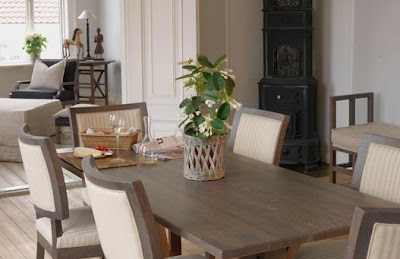
 Since I started my Kips Bay Decorator Show House coverage with a photo of the beautiful room designed by Bunny Williams, I thought it would be fitting if I ended with her as well. Most designers have to borrow all the furniture for their rooms so it was lucky for Bunny that she could borrow from her own BeeLine Home collection of furniture and accessories. Each piece was inspired by something that Bunny either owned or wished to own and produced in limited editions. She's also debuting more products tonight at a little soiree!
 Bunny also worked for Albert Hadley for whom this year's show house was dedicated and she was one of the only designers to make reference to the legendary designer. There were literal references such as the drawings on the mantle and "Don't Forget" notepads as well as a red egg chair and star motif on the rug. Bunny said she was thrilled to create a room that honored her friend and mentor!
 What I loved was that the room was broken up with an area for seating around the fireplace and a dining area with large table. All of which worked together perfectly.
  Everything is a BeeLine piece in this photo but they all work perfectly together. The Bottoms-Up Drinks Table was my personal favorite and one that I might have to buy for myself!
 This room was also a perfect breath of fresh air for spring. The walls were a pale blue and there were not only real flowers and plants but also large botanicals on the walls.
  The orange chairs also looked great against the blue walls! The Turquoise Glazed Ceramic Lamp is a bargain at $500 retail too!
  This reminds me that I need to create a little bar area in my own apartment!
 Everywhere you look, there is something beautiful and interesting!
 I loved all the vintage looking art. Bunny even thought to create a little area with trays for her press materials that is very chic!
 This room has everything including a flat screen television tucked into the bookcase!
 This concludes our coverage of the 2009 Kips Bay Decorator Show House! I hope you enjoyed this peek into just some of the 32 rooms. I want to thank everyone who helped to put it all together and all the designers who took the time to speak with me. It was such a pleasure attending and meeting them all! I hope that more of you will make an effort to visit this beautiful home that benefits the Kips Bay Girls and Boys Club!
 2009 Kips Bay Show House: English Basement
 By the time I got down to the English Basement at the Kips Bay Decorator Show House, I was exhausted but I'm glad I didn't skip it. There are some great rooms down there! The kitchen that was designed by St. Charles of New York, is directly under Juan Montoya's room and is the same size. As you can imagine, most New York kitchens are pretty small so to have this much room would be amazing. It's actually almost too big! I'm not sure if you can tell in these photos but the cabinetry is a beautiful pale blue. The kitchen island also opens to reveal seating.
 For a basement room, the kitchen was light and airy. Which probably has something to do with the outdoor area beyond. According to Karen Williams and Robert Schwartz of St. Charles the "goal was to design a fluid space with four multi-tasking lifestyle vignettes - a continuous breakfast bar featuring concealed appliance center, a cooking hearth, a 12-foot kitchen island that cleverly converts to a banquet for extra seating, and a designated wine area complete with fireplace and tasting table."
 "The spectacular architecture of the mansion's limestone exteriors is echoed in the kitchen's cooking hearth and fireplace elevations, as well as the large floor-to-ceiling tiles."
 My favorite area was the breakfast bar where you can conceal the appliances when they are not in use. There was also a large pull out drawer for cereal in special containers!
 While you are waiting for something to cook or bake, you could go out and enjoy the greenery created by Plant Specialists including the huge palm trees!
 As any New Yorker what they dream about and one of them would be a washer and dryer in their apartment! Of course, a house as large as the show house would require multiple laundry rooms but I'd gladly settle for one! It even includes the Kelly Ripa and Electrolux new limited edition 'kelly green' energy-saving washer and dryer.
 Now, before you start leaving nasty comments about this final basement safe room designed by William T. Georgis, let me explain that it falls in the "fantasy room" category. A safe room could never contain a fireplace or windows or would ever look this chic! William T. Georgis designed the Safe Room as a "safe haven in a time of potential global wars, economic meltdown, ecological devastation, paranoia, and questionable human behavior."
 " The room contains a combination of art, furniture and weapons. George Condo's Jesus on the Cross, a 19th-century Danish Eqyptian revival chaise, and Richard Dupont's haunting sculpture of distorted figures, Untitled (Lever House Study), animate a lair upholstered in gray ultrasuede, lined with weapons, and stocked with survival supplies. An Empire bureau plat allows for writing, while the surveillance camera and stainless steel commode provide comfort and accommodate relief. The disco ball spins to the endless party tracks." If you have to been cooped up in a safe room, you might as well be comfy and cozy!
 William T. Georgis's partner, Richard Marshall, is the art advisor to art collector and real estate titan Aby Rosen who owns this building and generously donated it's use as the show house. Aby Rosen also owns Lever House where artist Richard Dupont recently showed his work. And his sister-in-law Serena Boardman works for Sotheby's International Real Estate and working on the sale of the $75 Million townhouse. Any takers?
 Smilla construction helmet lamp
A little unfortunately incident which destroyed John's Smila Blomma turned out to be an opportunity to get creative. He ends up with a cheeky storage place for his Construction Helmet with a lamp to boot.
He says, "Unfortunately I destroyed my Smila Blomma from Ikea, due to mistreatment: I let the bulb come to close to the plastic. After removing the Blomma the construction of the lamp is as such that I could turn it easily into a (echo machine on) Construction Helmet Lamp (echo machine off). It needed just 1 screw, and I can still use the helmet as an helmet.
One can even go really nerdish and turn it into an autarkic lamp by adding a solar panel or a small windmill onto the helmet. During working day at the construction site the solar panel or windmill will charge a battery, at night the helmet can be put on the Smila Blomma construction next to for instance the wardrobe section of your house. Here it than functions as a 'Honey, I'm home' lamp." Nice!

Fniss gadget organizer and charger
Ariel made a gadget organiser and charging station from the Fniss wastepaper basket.
It's pretty easy. All you need to do is basically cut a piece of plywood to "stop" the top and form a base for your gadgets to rest on. Then, cut a hole in the plywood and drill a hole in the Fniss for your cables.


See instructions for gadget organiser.
It's pretty easy. All you need to do is basically cut a piece of plywood to "stop" the top and form a base for your gadgets to rest on. Then, cut a hole in the plywood and drill a hole in the Fniss for your cables.


See instructions for gadget organiser.
Pardon me while I lean out the window and cut some flowers!
 I was trying to work on my last two Kips Bay Decorator Show House posts but quite frankly, I'm too tired to finish them. But I know how much everyone loves opening their Habitually Chic email in the morning so I am leaving you with this amazing townhouse that I walked by today. The beautiful floral smell was wafting down the street and I was in awe that they were climbing up to the roof! I have never seen anything like it! At first I thought they were lilacs but further research has led me to think that it's wisteria. I definitely think I will picking up a bouquet of flowers for my apartment tomorrow. Albeit on a much smaller scale! Enjoy!
Swedish Decor in the Hamptons
 Here is a lovely home in Sagg Harbor designed by Heiberg Cummings Design. Known for their contemporary Swedish design mixed with old world antiques; they create interiors that are interesting and layered, as well as light and airy. This home is clearly influenced by the Swedish style but tempered with traditional beach house design, creating a warm and inviting atmosphere.
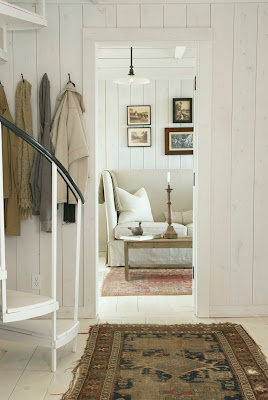
Heiberg Cummings is known for its combination of light, simplicity and subdued colors. Notice how the walls are lightly washed with white, but instead of harsh and stark, they seem luminous and soft. You can still see the knots of the wood peeking through. I love the addition of the old, worn rugs; notice the fraying ends. The rugs add an interesting layer of warmth against the white wood walls and painted floors. Also notice the sofa's interesting lines and use of linen slipcover.
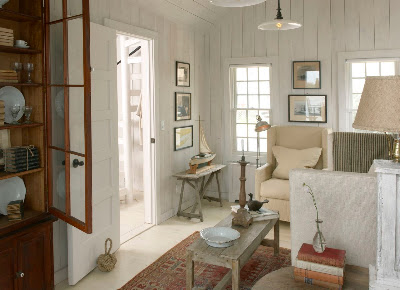

Lets take a closer look at the details that warm up this space. Notice the texture all over the room. On the floors we have worn oriental rugs, a rope knot as a door stop. Rising up you notice Linen slipcovered furniture, old washed wood tables scattered around the room, a barn wood lamp with linen shade, and even the addition of worn leather books. The windows, take on a more modern feel; adorned only with shades. All these elements add layers of warmth and interesting texture to this space.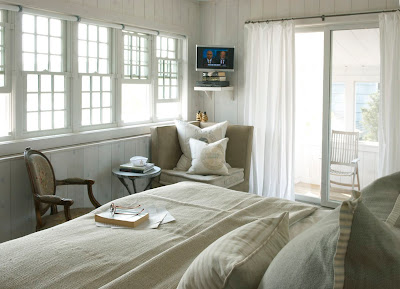

Moving into the bedroom we see an antique chair mixed with new slipcovered upholstery. Bed linens are all natural materials that look soft and inviting. Notice the obvious lack of color which creates a soothing subdued natural palette. Pull down shades in lieu of drapes on one wall look clean and contemporary.

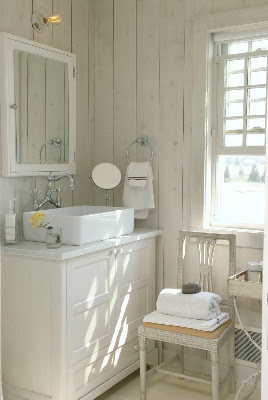
The bathroom is a mix of old and new. Notice the sleek light fixture and the antique Swedish chair, both elements pop because of their juxtaposition.


Heiberg Cummings Designs has offices in New York and Norway; above Bernt Heiberg and Bill Cummings. They have designed some wonderful furniture with Norwegian company, Hodnebo. Below are just a few of their lovely new pieces.


Do visit Heiberg Cummings Design to see many more wonderful interiors and visit Hodnebo to see more of their collaborative efforts.
The easiest, cheapest, custom drapes EVER.
Have you ever lived with something in your house for years and YEARS, not in love with it, but liking it OK, just fine with it?
And then you change one little thing in the room and it sets you off on this roll that is very unbeneficial to the pocket book?
I've been transforming our loft into the toy room and am trying to walk the very fine line between a cozy space for the adults and a total kid space.
I had drapes in the room that I bought for our previous place that were a faux silk (I think the fancy name is polyester) and were very shiny.
 This is SO EASY. I promise you can make these by yourself in less than 20 minutes. Just find a fabric you love, and get about a yard an a half of it (18 inches or so) for each treatment. (You can do whatever size you want, but I like to stick with this measurement.)


 You won't even remember they are there, let alone anyone else noticing them!
 The great thing about this project is you can use just about anything for the main part of the drape -- sheets, old window treatments -- any fabric. Then you can splurge on a loverly fabric for the topper (on sale, with a coupon of course).
 I usually add lining to my drapes, but I love the way these let the light in the room:
P.S. Remember the phone I taped together, in a sad, sad effort to avoid spending money on a new one (so I could spend it on other things)?? Well, this is it tonight:
And then you change one little thing in the room and it sets you off on this roll that is very unbeneficial to the pocket book?
That's me.
I've been transforming our loft into the toy room and am trying to walk the very fine line between a cozy space for the adults and a total kid space.
I had drapes in the room that I bought for our previous place that were a faux silk (I think the fancy name is polyester) and were very shiny.
Like I said, for years, I thought they were just OK. Especially when it was just an extra room we only used once and a while. But then when I started making changes, they were too heavy and all wrong for the lighthearted space I was trying to create.
So I went looking and found exactly what I was looking for -- muslin! It's basically just a cotton, gauzy-type fabric. And whoooeee, it is CHEAP! I didn't even hem it -- I love the frayed edges:
 I found fabric for the toppers long ago -- they are my favorite part:
I found fabric for the toppers long ago -- they are my favorite part: This is SO EASY. I promise you can make these by yourself in less than 20 minutes. Just find a fabric you love, and get about a yard an a half of it (18 inches or so) for each treatment. (You can do whatever size you want, but I like to stick with this measurement.)Use your hemming tape to hem up all the edges:
Then just hang it from the clips, like I showed you here, on top of the main drapery fabric:
Then, to make sure they stay put and look like they are sewn together, just use a pin on each side:
You won't even remember they are there, let alone anyone else noticing them! The great thing about this project is you can use just about anything for the main part of the drape -- sheets, old window treatments -- any fabric. Then you can splurge on a loverly fabric for the topper (on sale, with a coupon of course). The muslin was only $15 for five yards. And it was 108 inches wide, so I really didn't need that much. I could have easily gotten away with three yards (these are really long drapes) and spent less than $10 for both:
 I usually add lining to my drapes, but I love the way these let the light in the room:
I'm almost done with little tweaks in the toy room, and will show you soon. (I know I keep saying that!)
P.S. Remember the phone I taped together, in a sad, sad effort to avoid spending money on a new one (so I could spend it on other things)?? Well, this is it tonight:
My sweet, loving, two-year-old threw it. Outside. On the concrete. See those two wires sticking out? Those were the only things holding it together. And when I made him pick it up and bring it to me, he decided to pull the two parts apart. SNAP!!
New phone. Tomorrow. Dang.
Subscribe to:
Comments (Atom)


