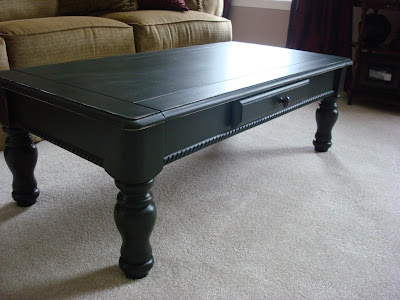
 Remember this find from a few days ago? A steal for $24.99 at Goodwill!
Here she is, in all her glory! I removed the knob and replaced it with an extra I had from our kitchen:

When I sanded it down I was beyond thrilled to find out it is REAL wood. Not laminate or veneer. Real knots in the wood and everything: I didn't poly the table, because being real wood, any scratches or nicks will add to the character. I love the dents all over the top:
  I distressed the edges. Distressing stresses me OUT. Seriously. Spending that much time painting and then messing it all up?? Wow, it really messes with me. But it is worth it:

 I felt like I was doing a photo shoot, I was taking so many pictures...YEAH BABY! YEAAAHHHHH...
 I almost painted it chocolate brown, but there was too much of that going on in the room. I decided to pick up on some of the accessories and go with the black:
 It pulls in the black from the chest on the sofa table, the lamp, and the kitty. Oh. Wait, not the kitty.
Just a refresher on painting furniture:
Have a great weekend! (OH, and I'll tell you the New Kid's story soon. Just so you know...Joey was SUPER sweet!)
 I didn't poly the table, because being real wood, any scratches or nicks will add to the character. I love the dents all over the top:
  I distressed the edges. Distressing stresses me OUT. Seriously. Spending that much time painting and then messing it all up?? Wow, it really messes with me. But it is worth it:
 I felt like I was doing a photo shoot, I was taking so many pictures...YEAH BABY! YEAAAHHHHH...
 I almost painted it chocolate brown, but there was too much of that going on in the room. I decided to pick up on some of the accessories and go with the black:
 It pulls in the black from the chest on the sofa table, the lamp, and the kitty. Oh. Wait, not the kitty.
 Just a refresher on painting furniture:
You don't have to sand, but it never hurts.
Primer is mandatory. MANDATORY. Unless you are painting bare wood.
Letting the primer cure (dry) for the recommended time is key. I cannot stress that enough.
You can get your primer tinted to the color of your paint (great with black or red).
I use a foam roller to paint all my furniture (angled brush for the detailed areas).
Letting each coat of paint dry for the recommended time is also important.
Sometimes I use poly over furniture but most of the time I don't. Poly leaves roller marks that drive me nutty! (Any suggestions for that?)
Let the furniture cure for up to a couple weeks (sometimes more, sometimes less) before you put anything on it, like accessories.
Have a great weekend! (OH, and I'll tell you the New Kid's story soon. Just so you know...Joey was SUPER sweet!)


