Month in review!

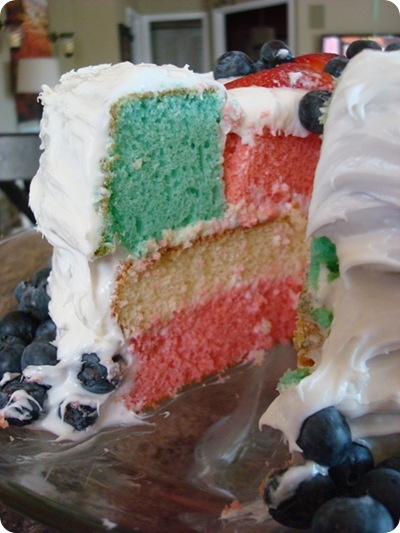
Well hello! You are all SWEETAYS for your sweet comments on my aqua and pink flag cake. I cut a piece off tonight for hubby and I must say, it’s pretty cute. Not Fourth of July cute, but CUTE.  :)

And as many of you mentioned, I’m just on the cutting edge with the hot colors of aqua and coral. I totally did it on purpose. NOT.

I have decided to start doing a review of posts at the end of each month – just in case you’re new around these parts.  :) Also, there’s usually a few things I forget to mention or that you lovelies share that I think will be helpful to others.

The beginning of the month was FUN because I took my first two trips to IKEA – both within a week! Whoohoo!!

My plan for a sofa table in our great room had fallen through and all of the sudden I had to have the Hemnes coffee table instead:
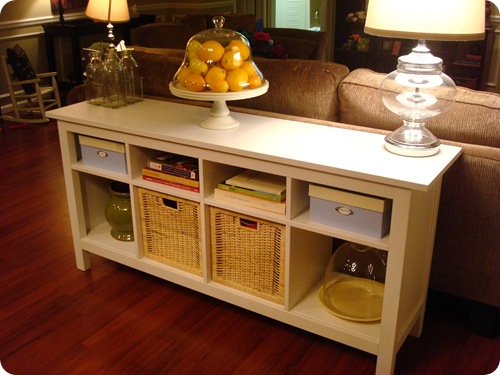
Isn’t it loverly? I LOVE YOU IKEA!! Kisses!

I posted week three of the kitchen redo, where I shared some more of my IKEA goodies and an update on the progress of our kitchen:

I swear I’ll do another update again this week – I haven’t gotten as much done lately as I had hoped, but I do have a few more projects to share! (No, it’s nowhere close to done.)  :)

The June Before and After linky party was kicked off with my first attempt at strawberry freezer jam:

And it was YUMMY!! Hmmm…now I’m hungry.

It only took three weeks, but I finished the beadboard backsplash in the kitchen:

044_thumb[1]

And I LOVE it! It is by far the biggest transformation in the room, and the cost for the beadboard was less than $50. I used the eight foot panels of primed beadboard from Home Depot, and they run about $15 a package.

Many have asked how it’s held up near the sink, and it’s GREAT! I used semi gloss paint on beadboard, and it’s sealed really well. I can wipe water right off. I was a little concerned before I installed it, but now have no worries about having the beadboard near the sink.

I shared my hatred of evil laundry, and since our dryer is on the fritz, I drooled over one of these:front loader
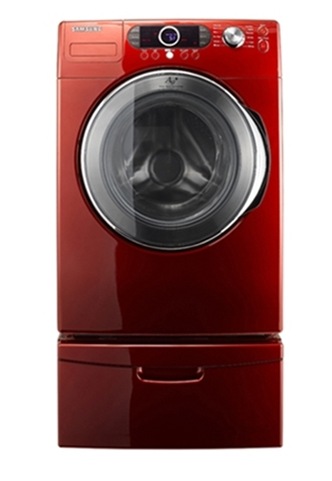
You all were SO helpful! The great majority of you love your front loaders, but those who don’t passed along some important info we’ll consider when buying a new washer and dryer set.

There were so many great suggestions on trying to get our current dryer to work – all we had tried, unfortunately. Bummer. One of those was to really clean out the lint trap, which is a good tip to pass along. It looks like it’s clean, but you need to use dish soap and a bristle brush to clean it out. You want water to run right through it.

Overall, nothing we tried worked, so the repair guy is coming tomorrow because the mounds of laundry are taking over!! Ahhhh!!

Every now and again I like to share what I’ve learned about blogging, and this month I talked about the importance of leaving comments:

blogger-comments-page

It really, really will bring more readers to your site! Try it out!

A couple of weekends ago, two girlfriends and I headed out to my favorite city in the world – the fabulous New York City!:

We went for the last of the NKOTB concerts (at least for a while?). I forgot to mention that the concert that weekend was the BEST one EVER. I’m not even kidding. Those Boston boys men know how to entertain!!

OH, and I forgot to tell you something wonderful!! I’ve mentioned before that there is a fabulous old Italian woman who used to sit outside our favorite restaurant in Little Italy:

Her name was Lucy, and for years, every time we’d go, she’d be there. Our last trip she was nowhere to be found and we had assumed her time had come (she’s got to be in her 90’s!). So when I was there, I just had to ask our waiter about her.

Well he looked at me weird when I mentioned her name, and I almost teared up, thinking the worst. But he was just surprised I knew who she was – and Lucy is alive and well! :) She had just walked out right before we came in that afternoon, and he was hoping she’d return in time so I could say hello, but I never got the chance.

I was SO happy to hear that the pasta and wine (Lucy swears that’s the key to a long, healthy life) are still working!! :)

The peeps at Silhouette sent me a craft cutter to try out, and one to give away to one of you Squeezies!! For my first project, I made a stinkin’ adorable herb crate out of a thrift store find:herb crate
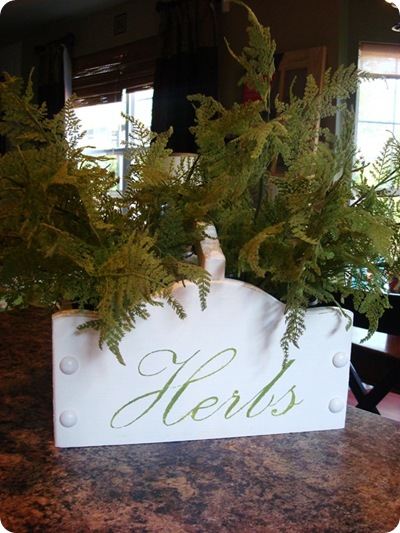
And later that week I fed my labeling obsession:

And it felt gooooood.  ;)

Last week I shared my cutie American flag door decor:

It was less $10 and took less than an hour to make, start to finish. I love seeing it as we drive up! :)

Many of you commented on my flower growing skills and I must say, I have little to do with the gorgeous petunias. :) I give props to Mother Nature for that one – the petunias just love the water!! (And it’s rained like the Pacific Northwest here lately!)

And finally…the beautiful pink/coral/aqua/turquoise cake, for your enjoyment:

It really is pretty darn good. :) If you want to try it out, check out the comments first. I used gel coloring, (not the icing stuff), but many of you bakers shared your favorites products that work much better – I’ll be sure to try them out next time!!

I had some fantastic giveaways this month from My Design Guide, The Pumpkin Patch, American Express and of course, Silhouette!

And I have to send out a big fat thank you to my advertisers for this month:

Bomobob’s beautiful photography:

Dimples and Dandelions boutique with adorable decor and clothing:

Photo Jewelry Making carries everything you could need:

My Design Guide can help you with design dilemmas big and small:

Well, that’s the month of June in review peeps! Thanks for coming along for the ride and welcome to the party if you’ve just joined us!  ;)

I’ll be back with the update on the kitchen…stay tuned.

An Expedit-ed Workspace


Materials: 2 Expedit 2x4 Bookcases, 1 VIKA KAJ leg, 1 Lack shelf, 4 Capita legs

Description: When I first moved two years ago I purchased an Expedit 2x4 Bookcase and laid it on its side against my main wall because I liked that look. I had a Lack shelf of the same color from a previous apartment, so to add some storage I attached some Capita legs from the clearance section onto that and made a little top shelf.

Later on, I wanted more desk space and a well-coordinated living room/office, so I got an identical Expedit case, cut 45-degree angles at the ends of both long pieces, and put together an Expedit-based desk. A VIKA KAJ leg at the wall-facing corner keeps everything stable.

If you wish to pull off a similar hack, take plenty of time to measure the 45-degreee cuts, paint the interior connector pieces (you cram those into the honeycombed paper inside the cut shelves for stability and to connect it) before assembling the finished product. Also, measure the VIKA leg, as the desk will have to settle into place if put on carpet.


Altogether, I'm happy with the way this area looks, and even happier with the tons of workspace it affords me. The whiteboards on the walls are a big bonus, too. Just get some melamine panels at your local hardware store and anchor to suit.


See more photos of the Expedit desk.

~ Brad Czerniak, Canton, MI

Summer Rerun

I'm busy working today and trying to get through a thousand annoying emails so I'm posting an oldie but a goodie from 2008. This fabulous house in the Hamptons used to belong to Steven Gambrel before friends of LA designer Ruthie Sommers bought it and asked her to decorate the place. I love the colors and casual feeling which is perfect for a house near the beach. It was published in House Beautiful so you can read more about the details online. Enjoy!


Photos by Don Freeman

Vika Curry speaker stand


Materials: Vika Curry leg, Ekby Statlig shelf

Description: The goal was to make a pair of cheap and simple speaker stands. Vika legs are just suitable height to bring the speaker to the ear level when I'm sitting down, and in black they will match the legs of my desk. For the base plate I used an Ekby Statlig solid wood shelf in 19cm width. To put it all together I bought an 8mm threaded rod in the hardware store and a couple of nuts and washers.

1. Vika leg has a bolt welded inside the tube at the top, where the mounting plate is screwed on. It had to be removed to make room for the threaded rod. It's spot welded in 2 points behind the plate, and it comes off after some rocking back and forth with large pliers. I have also drilled a hole on the side for stealthy speaker cable routing.


2. Ekby shelf was already suitable width at 19cm, I only had to make one cut to make it appropriate length. The central hole is for the mounting rod, and the second hole is for the cable. I carved a rough round shape matching the leg for easier centering later. I've used some furniture oil on the wood to make it a little darker and more durable.


3. Feed the rod through, put on the washer and the nut. Do the same on the top side of the base and tighten.


4. Feed the cable through and assemble! The top plate tightens the whole construction to make perfectly vertical and solid. Because there's a nut and a cable under the base plate, stick 4 rubber floor protector pads of suitable height under the plate.


Or for some little extra hi-fi-ness, a set of speaker cones/spikes could be used. They might be more expensive than the rest of the stand, though ;)

~ Max, Finland

Gorgeous Grisaille!

(down east dilettante)
Grisaille painting and wall papers have always been a love of mine. Grisaille (pronounced "griz eye") is the french word for shades of grey. This monochromatic technique was done both because artists could travel and do the work with out supplies, and the Grisaille painting could be a sample and/or under painting over which pigments could be applied.
Linda Coulter, a wonderful painter explains in her website: This concept was developed many centuries ago when pigments were very scarce. The Old Masters had only a handful of pigments to accomplish their beautiful results so they had to push each individual pigment to its fullest capacity to be able to achieve the luminosity in their art work that made them famous. In those days when pigments were extremely expensive, and it was also a way to save money. A sister to Grisaille is the less known Brunaille - which is in shades of brown. Below are some of my favorite examples.
The first is Martha Stewart's entry hall in her Turkey Hill House. This large mural stopped me in my tracks the first time I saw it . Lovely!
Here a common suburban two story entry turns extraordinary with this hand painted design.(down east dilettante)
This historic house turned museum is in Portsmouth, NH. The Moffat-Ladd house mural is likely Dufour wall paper from early 1900's, which depicts the Bay of Naples. To learn more about this wonderful house click here.

(architect design)

Here antique wall paper panels found at the Louvre are stunning. Read more about them on Architect Design here.

(Cote de Texas via Edie van Breems)

One of my favorite images is from Cote de Texas via Edie van Breems of Libby Holsten's home click here. The curves of Mora clock wonderfully compliment the mural behind it.

I love the room above, though not traditionally Grisaille or Brunaille, the addition of the shades of green and the side panel painting make for a gorgeous wall.

I adore this 18 century hand blocked Grisaille wall paper from Wendy Lewis at the Textile Trunk. You may not be aware of this, but Wendy also has a gorgeous selection of rare antique wallpapers.

This particular piece took my breath away! It is just stunning in shades of cream and gray. I envision it framed in my Living room or Dining room like a rare work of art, or perhaps I could cover a screen with it. Oh the possibilities!
(photos above Textile Trunk)
Though Wendy does not always list every gorgeous paper she has (her wallpapers move fast and are in great demand by her interior designer buyers) send her an email and she will let you know what treasures she has recently found. Click here to contact Wendy.
If you do decide to buy this let me know how you use it. But if its sold by the time you read this, you may end up seeing it in one of my clients homes or even in my own house because I just can't stop thinking about it!!

Cake FAIL

Many of you know I share the good and the bad on this little ‘ol blog. I have shared my house at it’s worst, as well as many projects I deem “science fairs” (translation = they don’t go well).

Well this one is in the science fair category for sure.

One of the many things I love about blogging is that I will now try things that I may have never attempted, because if it turns out I’ll want to share it with you all. And if it doesn’t turn out, I’ll want to share it with you all.  ;)

Let’s preface the rest of this post by saying I have baked a cake before. Many. You may not believe me after I show you this, but I cross-my-heart-swear I have.

Swear.

OK, a few weeks ago, someone on twitter sent along a picture of one of the cutest cakes I’ve ever seen – I can’t remember for the life of me where I saw it, but it was an ADORABLE Fourth of July flag cake. Not the regular sheet cake, but one that looks all boring with white icing and then PADOW!, you cut into it and there’s this gorgeous American flag cake.

Adorable.

So I’ve planned for weeks to try this out. And today I did.

And it:

a.) took FOREVER

b.) did not look like the picture

c.) like really, really did not look like the picture

d.) still tasted really good. :)

I figured I was going to have issues when I added the food coloring to the batter:

I needed some of the batter to be red for the red stripes, some white, and some blue for the blue corner of the “flag.”

Ummm…that batter up there? It’s not red. It’s pink. Maybe coral? Not red.

I added a little gel food coloring, then more, then a lot. Still coraly pink. Ohhhhkay.

I trudged on…and it was just one thing after the other. I learned some things this first time around so next year (oh yes, I will try it again!) I’ll remember them.

First tip is to just make all of the cake batter at ONE time, then segment it into five equal parts batter for all of the stripes. You can then color each batch whatever color you need, instead of making separate batches and coloring them as you go.

I did the red pink batter first and baked those cakes. Then I was going to make the white stripes, and put some of the batter aside to make the blue cake I needed. But I lost my mind for a few seconds and put the blue coloring in before I separate them – and then tried to get it out before I mixed it.

It didn’t work.

Hot mess. HOT.

I ran out of cake mix (oh yes, I used box mix!) and found a white Christmas cake mix in the pantry that didn’t expire till next February – SCORE!! I used that for the white layers I needed.

But it was still just a mess. I got whipped icing cause I LOVE WHIPPED ICING and it did not cover the cake well at all – I mean, seriously. Are you kidding me?

I just said forget it, garnished it with some stinkin’ fruit, and from the outside it looked OK:

OK, it was a hot mess. Just humor me.

But when you cut it open, the fruit on top accentuates the clash of the blue/aqua and red/coral/pink:

american flag cake

Awesome.

In the original cake I saw, there were two bottom layers of red and white, then two smaller white and red layers on top next to the blue. I didn’t have room for the top white layer. So my flag is red, white, red. Gah.

To make the flag, the bottom layers are just round cakes. The blue corner is a layer of cake, cut into a ring and placed on top of the other two. The middle two layers (what should be two layers) are the inside circle of two additional cakes. You ice between layers and then piece them together.

It’s just that easy.  :)

When hubby saw it today he was so excited I had made cake!

Then I asked, did you see it, the inside? Do you like it?

“Yeah it’s cute!” (He says just seeing the fruit and white icing. From far away.)

“See the flag inside?”

He steps closer.

“The what?”

“The FLAG.  See the three layers of pink, white, pink and the aqua? It’s an American flag!”

Crickets.

 “Ohhh, yeah. I see it! It’s cute!” (LYING. Because he loves me. And he still wants a slice of cake.)

I must say, the leaning tower of pink and aqua cake is absolutely scrumptious:

It’s not so pretty but ummm umm it’s GOOD!! :)

I have a ton of cake scraps left:

022

(Uh, is it me, or does it look NEON?)

So tonight I made some itty bitty trifles:

mini trifle

The cutey itty bitty trifle bowls courtesy of WalMart -- $2 each!

Again, I continue to accentuate the pastel tone of the cake with the fruit, but you know what? It’s GOOD! :)

So there you have it – my science fair cake fail. But what do you consider a cake fail – if it looks like a hot mess, or if it tastes like a hot mess?

Maybe it’s not a complete fail? Just a half-way one? I’m going with that.  :)

I’ll be back soon with an update on the kitchen! Kitchen projects I’m pretty good at. Fourth of July cakes – notsomuch.


P.S. The cake was from a blog with the title that was something like 18 and baking, or something like that? If you know of it, let me know! :)

**Thanks! I found it! Click here – this girl is ahhhmazing!!

P.P.S. Many are suggesting gel food coloring and that’s what I used – maybe the whole tube just isn’t enough?  ;) I have no clue – any other ideas?

This post brought to you by:

rustedcapture125

Check out this stream