 I know it took me forever to get this post up, but I’m finally going to share the rest of the steps it took to get the stairs to where they are now – that would be GORG. ;)
This process took a while, but the planning before that took a good year – I took my time deciding what to do. I figured they would look fantastic, I just wanted to make sure they would be safe. I did a lot of research over the year, including digging up some old photos of our house during the building process. (As you can see above.)
I wanted to make sure I didn’t dream up the beautiful wood steps with the rounded edges:

I didn’t. Yay!
Next step was getting up the nerve to rip up the carpet. I told you how I started this process here. When the carpet was up, I was left with this:
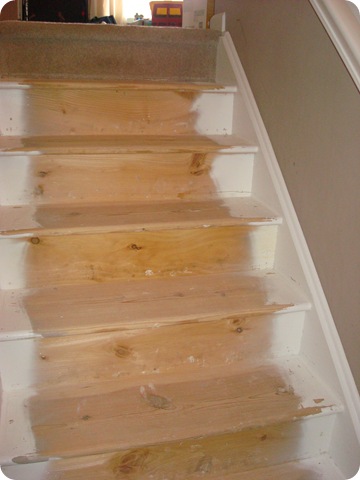
Many of you have asked if I did anything to the steps – put any wood on them, etc. The steps were just as you see them here when I pulled up the carpet. We were lucky to have the rounded edges. If I hadn’t remembered those edges from when we built the house, I probably wouldn’t have attempted this project.
I hear you can purchase wood treads at places like Lowe’s and Home Depot and install them over rough wood.
You can see (above) where I started to work at the overspray on the steps with my little handheld sander:

I used a 50 grit paper and it really was knocking it down – it was just going to take forever and a day. Enter my wonderful father-in-law and his assistant and their fab, much more powerful than my little mouse, sander. It took them a couple hours of sanding, but it did a fantastic job.
This part was the hardest for me though – sawdust was EVERYWHERE. I found it in odd places for a while:

I am still finding it places.
I actually had started priming some of the risers (the parts that go up) before they finished sanding. If I could do it again, I wouldn’t have primed anything until it was all prepped and ready.
My next step was to start the staining. I already had some stain from a previous project. It didn’t work for that, but it was perfect for our stairs! It’s Minwax Bombay Mahogany in gloss:

(The pic above is of the satin finish.) This type of stain is a polyshade – which means the poly is mixed in already. Although after living with the stairs for a while now, I think I will go ahead and do a coat of poly over them anyway, to add a bit more of a glossy sheen. (I found a product that you can add over it to make it slip-proof, so I’ll let you know how that goes.)
To stain, I used painters tape and taped off the treads and went over and over them a few times to make sure there was a good seal:


You can see why I wouldn’t recommend priming or painting first – the stain got on some of the risers as I worked. Stain is easier to cover with primer and paint than paint is to cover with stain. :)
At the edge of each step, I tore off little pieces of the tape to go around each tread:

I did two coats on each of the stairs. I did most of the staircase every other step with each coat – this way you can still get up and down the steps. Although going down every other step is really quite a pain – I don’t recommend it. :)
I would do it at the end of the night so you don’t have to go up or down at all. The stain takes about six hours to completely dry – or at least that’s how long it says you need to wait between coats. I used a fan a lot to speed up the process so we could walk on them faster. :)
I figured out how we would get up and down the steps, but I didn’t factor in the three fat cats that live in this house. Uhhh…it hit me about five minutes into the first step that they were going to step on them. The fan helped deter them a bit, but I did find these on the landing one night:
 Isn’t that the cutest little paw print ever? You could actually see where the stain wore right off the paw as it went across the landing though, so by the time they got to the other side, the stain was gone. Thank goodness. :)
Once the two coats were dry, I continued on the other risers with the primer and paint. I taped off the steps with paper so there was no chance I would get paint on them:

As I mentioned – it’s a whole lot harder to get paint off stain than to cover stain with paint. Like, I would cry, harder. :) I did two coats of primer, one coat of glossy white on each riser.
At the top step, I just left the carpet around the top step – not sure if I will keep it like that or not. I don’t mind it, but I may pull it up to see what the edge of the flooring looks like there. If it’s rounded off, I may cut the carpet and use a transition piece:

I am trying to avoid any kind of tripping hazard at all costs though, so for now the carpet is fine.
Some of the white paint did bleed through on the stain just a bit, and although it wasn’t bad at all, I wanted to try to fix it. I was surprised to find I could just use a razor to scrape it off – lightly of course. It worked like charm!
If you decide to do this, there are a few things to think about. I kept hearing mixed results from those that filled their holes with stainable putty. I had heard the putty doesn’t always take the stain well. So…I just left the holes as is!:

You have to look to see them, and I was sure to soak each hole with stain so you couldn’t see bare wood at all. I’m SO glad I didn’t fill these. The holes give it character, at least that’s what I say!
On the landing, I sanded down one of the planks with my little mouse sander a bit, and wish I hadn’t:

So let’s break it down, shall we? My total cost for the project was less than $30. YEP. Thirty buckaroos.
I had the stain. I had the primer and glossy white paint. I had the paper to tape off the steps.
I purchased two packages of the plank flooring for $10 each and didn’t even use all of it. I bought two packages of foam brushes to apply the stain, and those were about $5. I also bought more painter’s tape.
That’s it!
Other than the majority of the sanding, and the laying of the planks on the landing (which is installed just like beadboard, so I could have done it --- but it was nice to have help!), I did the whole project myself, start to finish.
Because I had help, I was at the mercy of their schedules a bit. It felt like it took months for this to get completed, but it was really only a few weeks! If I had done the whole thing myself, it would have been a week or two, but that’s only because I’m completely nuts impatient.
And this was the result:

You can see more pictures here!
Once I get the molding done on the walls I’ll be sure to share updated pictures! I hope this helps those of you who are thinking about trying it out! Be sure to read my first post about it here if you are curious about what’s under your carpeted steps.
If I didn’t answer one of your questions, leave it in the comments and I’ll answer you there.
Make sure to check out the Before and After Party links below! The party will be open to links till this Friday.
Thank you to my sponsor for this post!:


